Board and batten is a popular (and, ahem, BEAUTIFUL) type of accent wall that DIYers and home builders like to put in living rooms, bedrooms, entryways, and bathrooms. It’s a type of modern wainscoting that can totally be done by anyone with the right tips. It’s an affordable way to completely elevate any room’s design.

I’ve done two DIY board and batten accent walls over the last few months, so this guide includes all the details, measuring tools, and tips I WISH I’d known. Read on, and reach out to me with any questions!
Important note: You’ll find that a lot of these steps can be rearranged and still work well. I’m using the order I suggest, as well as tips about the different ways I’ve done it and mistakes I’ve made in the past. Here’s what we’ll cover:
- Tools & Supplies
- Planning your board and batten wall
- Step 1: Removing baseboards (optional)
- Step 2: Cut & install hardboard (optional)
- Step 2.5: Prime the Hardboard
- Step 2.5 and a half: Install the Hardboard
- Step 3: Measure and Cut Horizontal Board(s)
- Step 4: Install Horizontal Boards
- Step 5: Measure, Cut, and Install Vertical Boards
- Step 6: Caulk the Gaps
- Step 7: Fill Nail Holes with Wood Filler & Sand
- Step 8: Final Coat of Paint
- DIY Board and Batten Wall Results
Board and Batten Wall Tools & Supplies
To make your board and batten wall as easy as possible, I’ve attached links to the materials and tools needed on Home Depot, Lowe’s, and Amazon. Both Home Depot and Lowe’s offer online ordering and usually do same-day pickup.
Need more details on the best tools & supplies for your projects? Check my Incomplete List of the Best Tools & Supplies for DIYers. It includes ONLY tools & supplies that I’ve personally used and recommend, plus some honest notes about each product and what you really need (and don’t need).
Tools:
- Level: (Lowe’s | Home Depot | Amazon)
- Measuring tape: (Lowe’s | Home Depot | Amazon)
- Hardboard/Eucaboard (optional): (Lowe’s | Home Depot)
- Pencil: (Lowe’s | Home Depot | Amazon)
- Ideally a miter saw (Although other types of saws can work): (Lowe’s – I have this one and LOVE it | Home Depot | Amazon)
- Ear protection: (Lowe’s | Home Depot | Amazon)
- Safety glasses: (Lowe’s | Home Depot | Amazon – I have these cause they’re cute)
- Circular saw or table saw for hardboard: (Lowe’s | Amazon – I have the one linked here and highly recommend | Home Depot )
- Paint brush: (Lowe’s | Home Depot | Amazon)
- Caulk: (Lowe’s | Home Depot)
- Caulk gun: (Lowe’s | Home Depot | Amazon)
- Foam roller (the right kind): (Lowe’s | Home Depot | Amazon)
- Nail gun: (I use this one from Home Depot, and for a battery version, I recommend Dewalt or Ryobi )
- Brad nails: (Lowe’s | Home Depot | Amazon)
- Kreg rip cut guide (optional) (Lowe’s | Home Depot | Amazon)
If you remove baseboards:
- Crow or pry bar: (Lowe’s | Home Depot | Amazon)
- Steel putty knife: (Lowe’s | Home Depot | Amazon)
- Hammer or wooden mallet: (Lowe’s | Home Depot | Amazon)
- Pliers: (Lowe’s | Home Depot | Amazon)
Supplies:
- Primer (water-based, PLEASE!): (Lowe’s | Home Depot | Amazon)
- Paint (I used satin finish)
- Wood (I used 1-inch and 3-inch MDF boards from Lowe’s)
Related: There are SO MANY different ways to set up your board and batten wall–so I made a list! Ready 13 board and batten wall ideas to see examples in every room and get inspiration before you plan yours. 🙂
Planning Your Board and Batten Wall
As with every project ever, planning is an EXTREMELY important step. And YES, this is true even if you have ADHD like me and dive into projects too quickly. You won’t get far at all if you don’t take at least a few steps of planning first.
Related: I got into DIY home projects when I was a mom of 2 under 2 with no support. I created a free tool to plan projects around a family–get that in my guide to DIY projects as a mom.
For board and batten accent walls, there are just four main things you need to know/decide first:
- Baseboards (Will you keep the existing ones, or remove + replace them?)
- Which type of wood you’ll use
- Hardboard or no hardboard (also called eucaboard, this is an important decision if you’re working on a textured wall)
- Measurements of your wall space, your desired board and batten, and the spacing
However, if you want to do an accent wall with almost no planning whatsoever, check out my tutorial for a DIY geometric accent wall.
Planning Part 1: Deciding on Your Baseboards

The current trend or style for baseboards is to have thick, plain, square baseboards, like the above picture. But unless you have a new house, your baseboards are most likely thinner with some type of texture or shape, like mine:

And here’s a real shocking fact: baseboards are morally neutral. You do not have to get the “new” version, and you don’t have to replace your existing baseboards if you don’t want to!
However, the depth of your accent wall boards MUST match the depth of your baseboards.
That means you just need to know what kind of baseboards you’ll have, because you can’t add one-inch thick boards over baseboards that are thinner. That will just end up looking JANKY.

So if you decide to keep your existing baseboards or are just using a thinner style of baseboard, look for thin vertical boards, like ¼ inch plywood, 1/4 inch boards or ½ inch thick boards or plywood.
If you decide to remove and replace your baseboards, follow my steps below. This is not AT ALL as difficult as it may seem. You got this, I promise.
Pssst, I’ve made some pretty fun DIY t-shirts for you or for great gifts. Check out my designs in my Etsy shop Black Door Fits!

Planning Part 2: Choosing the Right Type of Wood
As mentioned above, part of this decision depends on the width of your baseboards.
But this also depends on your budget, because wood boards can range WILDLY in price. And this decision should also depend on how much prep work you want to do on the boards.
For both board and batten walls I’ve done, I chose pre primed MDF boards. They are ideal for accent walls because they’re flexible, so you really don’t have to worry about going through piles of wood to find perfectly straight pieces. They’re also completely smooth and usually pre-primed, so you don’t have to sand or prime them.

However, if you have older baseboards, you’re most likely going to need to get ½ inch pine or something similar, which is generally going to also be thicker than the boards I chose. But hey, different choices like these are what make board and batten accent walls interesting!
You could even get a ¼ inch sheet of plywood and rip it into wood strips the exact dimensions you want. In fact, I’ve heard of people using YARDSTICKS for their vertical boards–absolutely ingenious!
Important note: Make sure you also decide what kind of horizontal boards to use. Most board and batten walls use thicker horizontal pieces, which is why I chose 3-inch boards for my baseboards and top boards.
Planning Part 3: Hardboard vs. No Hardboard
Okay, this step may sound a little dicey, but stay with me!
Hardboard is also called eucaboard, and it’s just a thin panel with a smooth side and a rough side.
Why does this matter? Well, if you have textured walls and want a board and batten wall that’s completely smooth, like this one, you will have to use eucaboard or hardboard.

Basically, all you’ll do with hardboard is nail it your wall BEFORE nailing boards up. That part is extremely easy.
Related: Read my guide to Nailing into Drywall for details and a video on how to do this.
HOWEVER. The challenge with eucaboard comes with the measuring. Keep in mind that measuring things accurately and making things perfectly level and straight is NOT one of my strengths.
Eucaboard comes in 8 ft by 4ft sheets or 4x4ft sheets, so you will most likely need to use more than one piece of eucaboard to cover you’re entire wall. Which means there will be a seam where eucaboard #1 meets eucaboard #2.
So then you have to calculate where to cut BOTH pieces of eucaboard so that the seam is placed in the exact spot where a vertical board will cover it.
I AM NOT GOOD AT THIS. I did do it successfully with my friend Melissa, but it’s not something I’d be thrilled to calculate again.
So if you’re a math-y person, this is completely doable. If not, I would recommend just skipping it.
Eucaboard also can’t be cut with just a miter saw because of it’s size. Therefore, you need either a circular saw or a table saw. Again, if you already have these–totally doable. If not, just skip it.
I promise your board and batten wall will still look good withOUT eucaboard! But you should have the right expectations from the beginning. 🙂
Important note: If you choose to NOT use hardboard and NOT replace your baseboards, you can skip right to step 3 below. 🙂
Planning Part 4: Take All Measurements & Calculate Spacing
Finally, you just need to determine the size of your wall and the size of your board and batten before you actually head to the store. This will help you determine all the wood/eucaboard you need.
You should also determine the batten spacing you want at this point. And guess what–you barely have to do any math for this! At least if you do it my way. 😉
Here’s a video on how I calculate board and batten spacing:

Now, on to the actual steps.
Step 1: Removing Baseboards
If you decide to remove your baseboards, here are the supplies you’ll need:
- Crow bar or hammer
- Steel putty knife or multi-tool
- Rubber mallet
- Utility knife
This is super easy, and honestly I absolutely love doing it! Maybe that’s just because I’m always thrilled about whatever project I’m doing at this point. 🙂
Use the utility knife first to cut the caulk between your wall and the baseboard. It will create a small gap.

Then, place your putty knife into the gap, and whack the end of it with the rubber mallet. It will push the steel knife further behind the baseboard and naturally pull it off the wall.
You’ll have to do this in a few different places along the wall to pull the full baseboard off in one piece, but that’s it!

Feel free to pat yourself on the back, or awkwardly yell in your pajama pants, like I did the first time I removed something from my wall.
Step 2: Cut & Install Hardboard
If you choose not to use hardboard/eucaboard, skip this step and go to step #3!
Because of the large size hardboard sheets come in, you can’t use a miter saw to cut this. You’ll need either a table saw, circular saw, or jigsaw.
Make sure you read my guide to cutting a straight line with a jigsaw or circular saw. Since I wrote that post, I also invested in a kreg rip cut guide. It’s really helpful, but it probably wouldn’t be worth purchasing if you aren’t consistently ripping wood.
Don’t forget to measure the right place for your hardboard seam!
At this point, you may feel like you’ve done a lot of work…. Yet somehow, the wall looks worse.

Dark brown will do that to a space.
But fear not! This is an important step of the process.
Step 2.5: Prime the Hardboard
Since hardboard is a dark brown color, it needs a good coat of primer before being painted.
You can actually prime your hardboard at any point; before installing, after nailing to the wall, or even after your vertical/middle boards are installed. I’ve done it multiple ways.
I’m only including this step here because I believe it’s most efficient to do with a roller before installing the vertical board…. But it’s arguable.

Important note: Use water-based indoor primer, like Kilz. Early in my DIY years, I used oil-based primer (probably just because I happened to pick it up at the store) and I’m convinced it was made by Satan. Water based for the win, trust me.
Step 2.5 and a half: Install the Hardboard
Woop woop! This is an easy step as long as you’ve measured and cut your eucaboard correctly. All you have to do it hold the hardboard in the right location and use a brad nailer to attach it to the wall.
Don’t forget to anchor the board to drywall by nailing Xs. Again, there’s a full tutorial for this in my guide to nailing into drywall.

A big question I’ve seen people ask is whether or not to use construction adhesive (like liquid nails) for their DIY board and batten accent wall. The answer is really up to you, but my recommendation is NO.
I’ve seen other DIYers use adhesive behind the eucaboard and behind the board and batten pieces, but here’s why I never will: that is automatically ruining your drywall.
I’m a mistake-friendly, self-taught, ADHD DIYer. A looooooot of my projects have been complete fails, and I’m okay with that! But that also means that I want to have the ability to change my mind later.
By using nails the right way, your accent wall will be PERFECTLY SECURE. Adding adhesive is completely unnecessary. The only thing it changes, in my humble opinion, is your ability to remove the accent wall in the future without hating yourself.
Important note: Make sure to plan whether your eucaboard will go behind your baseboards or sit on top of them.
Step 3: Measure and Cut Horizontal Board(s)
The horizontal boards (the top board and baseboard) need to be cut, measured, and installed before the vertical boards. With all the measurements planned correctly, this is as easy as cutting your boards to size with your miter saw, painting them, and nailing them up to the wall.
Important Tip: Paint All Wood Pieces Before Installing
This is yet another optional strategy, but ALSO another thing that I’ve done both ways. And in this case, painting your horizontal and vertical boards BEFORE installing them makes a MASSIVE difference.
For one, it’s just easier. So much easier.
And you’ll avoid this from happening…

But more importantly, it makes the finish look SUPER PROFESSIONAL.
This is because when you paint your boards off the wall, you can use a roller to make the paint look super smooth and avoid all paint streaks. On the other hand, if you paint the boards while they’re on the wall, you have a ton of cutting in to do, and it’s very difficult to avoid paint streaks somewhere.
Of course, you’ll still have to paint some when your boards are on the wall (like after you fill nail holes), but doing at least one or two coats beforehand will make a ginormous impact on your DIY board and batten wall.
Step 4: Install Horizontal Boards
This is really as simple as making your board is level and nailing it in the place you want. Easy peasy.
But here’s a tip if you’re on an especially tight budget for this project: you can actually minimize your costs by strategically choosing where you place your top board.
Basically, you can get more panels out of each board. For example, a 1-inch MDF board is 8 ft tall, so you could get two 4-feet tall boards out of that, OR three 2-foot boards. It all depends on where you place your horizontal board.
In my bathroom board and batten, I did this in a very untechnical manner and just installed the top horizontal board in the spot I wanted it… but then I had to go buy more panels.
Related: Want another way to create a focal point in your room? See 21 of the best shiplap fireplace ideas!
Step 5: Measure, Cut, and Install Vertical Boards
Now for the vertical boards–you really start to see some progress here, and it’s exciting!
This step is basically just as easy as the one above. Cut the boards, check they’re the right size, paint them, and then install.
You can watch it happen in this 30-second long GIF:
And seriously…. DON’T FORGET TO PAINT THEM BEFORE INSTALLING.
I’m passionate about this because I did it wrong. Sigh.
Important Tip: Making Board and Batten Pieces Flush
As simple as this step is, DIY is never simple.
And did you know that in houses, nothing is ever level or straight EVER? I mean, that’s only a slight dramatization of the truth.
If you are like almost every other DIYer, you’ll go to install your boards, which are placed on the same exact wall as every other board, and you’ll notice that they don’t all sit flush.
HOW IS THIS POSSIBLE?!
It’s possible because nothing in life is perfect, okay? Very much including houses.
Honestly, it’s kind of encouraging. Because when you’re far enough away, I might seem like a normal adult who’s responsible for her life and her family. But then, you start messing with things, and OH, look, it’s actually all crooked and janky and imperfect!
…..Overshare? Naahhhh. We all have our things.
So anyway. For your wall, the solution is to use spacers to make everything flush. Spacers can be almost anything–I used tiny snips from a cardboard box!

You’ll just add these spacers behind your board and then nail through them. Here’s a video that shows the process:

Step 6: Caulk the Gaps
Once all your boards are installed, the finishing work begins!
Start by using paintable caulk to fill all the gaps and seams. The more boards you used, the longer this will take.
But hey, put on some kind of background music or podcast and just enjoy it. I used to feel so overwhelmingly antsy to finish every project and rush through the end steps, but this is what really makes the end result of every project look beautiful.
There are literally 14.8 MILLION tips about caulking online, but my current favorite strategy is to use a baby wipe or my wet finger, and usually a combination of both.
Step 7: Fill Nail Holes with Wood Filler & Sand

The next finishing task is filling all the nail holes with wood filler, letting it dry, and sanding it down.
Important note: You can also choose to fill your nail holes with caulk! Either option works well, but the benefit of wood filler is that it can be sanded down, while caulk can’t.
Step 8: Final Coat of Paint
Of course, after you have a million filled nail holes, you’ll have to touch them up with a last coat of paint.
And if you use a dark, bright, or deep color like I did, the wall will need 19 coats of paint (again, a slight exaggeration).
This is after the third coat:

But this is the LAST step, so make sure you really inspect it well to make sure there aren’t any streaks or bumps. And make sure you use a foam roller to avoid them–I like to do touch ups with a brush, then follow it with a roller to make it smooth.
DIY Board and Batten Wall Results
And that’s the end of your simple DIY board and batten accent wall! Here’s the black board and batten wall I did in the guest bedroom of my friend’s AirBnB, The Trendy Tudor:

Although the accent pieces go up to the shelf, the black goes all the way up to the ceiling and creates an absolutely stunning focal point. My friend styled it, which is what makes it so incredibly beautiful.
Bathroom Board and Batten Wall: Before and After
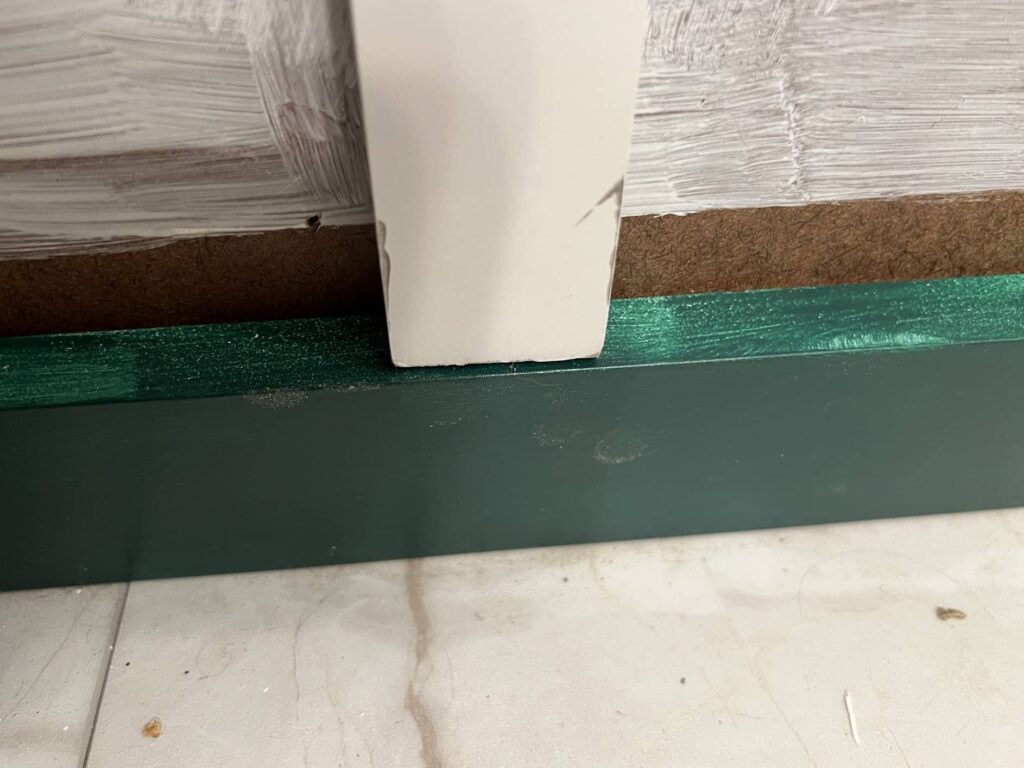
My bathroom board and batten wall is one of my favorite projects ever. Since this is my house, I got to choose the color, and I went with this BEAUTIFUL deep green called Dark Everglade.

Although the accent pieces go up to the shelf, the black goes all the way up to the ceiling and creates an absolutely stunning focal point. My friend styled it, which is what makes it so incredibly beautiful.
Bathroom Board and Batten Wall: Before and After
My bathroom board and batten wall is one of my favorite projects ever. Since this is my house, I got to choose the color, and I went with this BEAUTIFUL deep green called Dark Everglade.

I also attached these gold hooks from Hobby Lobby, which happen to match my new shower curtain perfectly! That was a happy accident.

P.S. I got this extra long shower curtain, raised the tension rod, and it makes the entire bathroom look bigger!
Related: Want another way to make your home reflect YOU–for insanely cheap prices? Check out my printable wall art on Etsy in the Black Door Shop. You can even get 20% off your order with the code 20OFF. 🙂
If you’re considering doing a DIY board and batten accent wall in your home, GO FOR IT! Let me know what other questions you have on Instagram or TikTok. I can’t wait to hear from you 🙂
More related posts: