Why am I writing this tutorial when there are approximately 328 MILLION other tutorials on tiling a kitchen backsplash?
Well, because I spent HOURS watching Youtube videos and reading tutorials about my subway tile backsplash before I tackled this. And they helped me so much–but I noticed that MOST tutorials online discuss the same parts of the process in the same way.
They all talk about buying tile, choosing the size and style, planning out the layout, applying adhesive, sticking the tile on, using spacers, and then adding grout is an afterthought.
It felt like most tutorials were 95% the same, and I still had a lot of questions after reading them.
So in this tutorial, I’m going to cover EVERY detail that I learned through the process and wished I had learned in advance. It’s going to be a BEAST, so here’s a table of contents so you can keep track:
- Supplies and materials
- Planning for your DIY subway tile backsplash
- 11 Steps to install
- How to tile a backsplash corner
- Before and afters
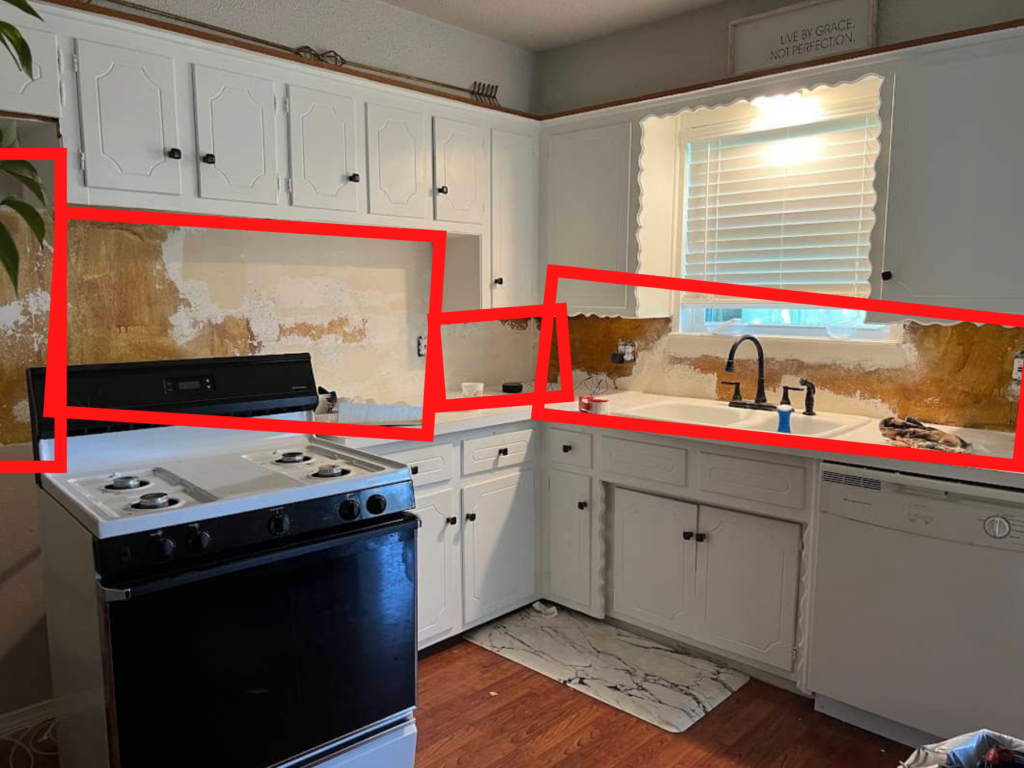
I’ve actually finished two DIY subway tile backsplashes before writing this tutorial, and I learned different things during each one. This tutorial will have examples, tips, and photos from both projects, so don’t get confused when you see two very different kitchens!
I will also *almost definitely* be continually adding videos about these projects to my TikTok and Instagram pages. I’m most active on those, so follow along!
Related: If you have to remove an old backsplash before installing your subway tile, make sure you read the step-by-step tutorial on How to Remove a Tile Backsplash (the easy way)!
DIY Subway Tile Backsplash: Supplies & Materials
It’s important to note that tiling is one of those projects with a fairly overwhelming supply list. I don’t actually think it’s one of the most difficult home projects, but planning and getting the right supplies is ESPECIALLY important and can be ESPECIALLY tedious. Keep in mind that you will most likely spend around $200 on supplies (if you don’t already have most of them) plus the cost of your materials.
To make your DIY subway tile backsplash as easy as possible, I’ve attached links to the materials on Home Depot, Lowe’s, and Amazon. Both Home Depot and Lowe’s stores offer online ordering and usually do same-day pickup.
Need more details on the best tools & supplies for your projects? Check my Incomplete List of the Best Tools & Supplies for DIYers. It includes ONLY tools & supplies that I’ve personally used and recommend, plus some honest notes about each product and what you really need (and don’t need).
- Tile saw/wet saw: I used this one, but here are similar options: Lowe’s | Home Depot | Amazon
- Safety glasses: Lowe’s | Home Depot | Amazon
- Trowel for spreading adhesive: Lowe’s | Home Depot | Amazon
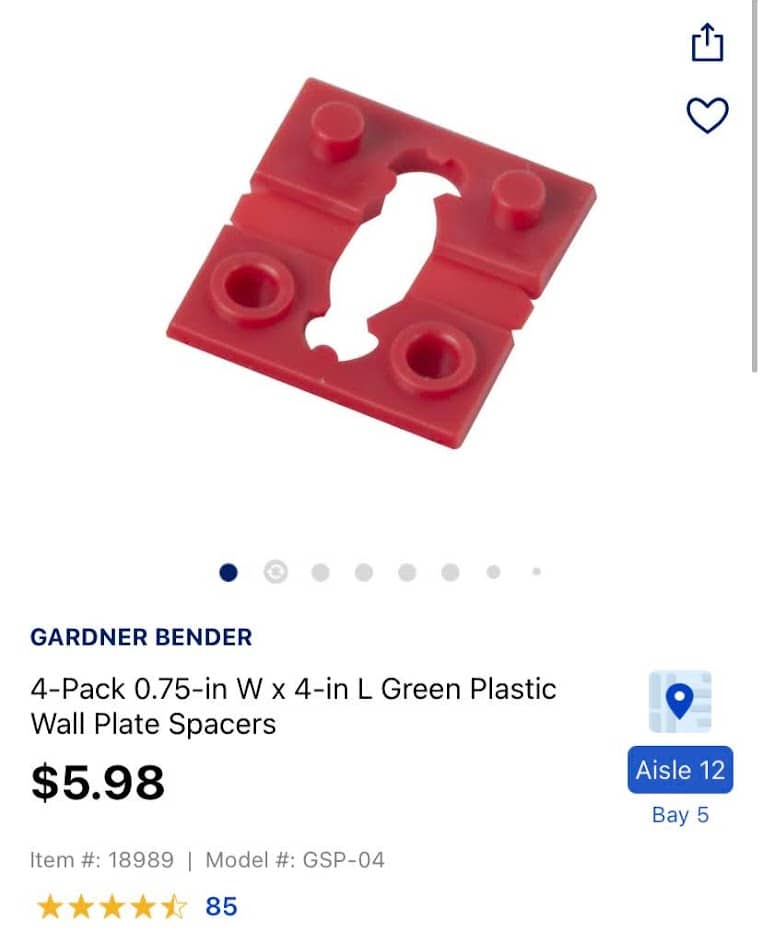
- Spacers (I used 1/8th inch) – Lowe’s | Home Depot | Amazon
- Marker (Sharpies wipe right off of ceramic tiles) – Lowe’s | Home Depot | Amazon
- Putty knife – Lowe’s | Home Depot | Amazon
- Level (Ideally a laser level!) – Lowe’s | Home Depot | Amazon
- Ruler – Lowe’s | Home Depot | Amazon
- Utility knife – Lowe’s | Home Depot | Amazon
- Pliers – Lowe’s | Home Depot | Amazon
- Bucket – Lowe’s | Home Depot | Amazon
- Grout sponge – Lowe’s | Home Depot | Amazon
- Grout float – Lowe’s | Home Depot | Amazon
- Caulk that matches the grout – Lowe’s | Home Depot | Amazon
- Microfiber cloth or blue towels or old t-shirt or cheese cloth – Lowe’s | Home Depot | Amazon
- White vinegar (optional) – Amazon | Walmart
- WIPES ON WIPES ON WIPES – (Microfiber cloths are ideal, or rags made out of old towels) Lowe’s | Home Depot | Amazon | Walmart
- Garbage bags or plastic to cover the counter – Lowe’s | Home Depot | Amazon
- Painters tape (optional) – some kind of tape to hold bags up – Lowe’s | Home Depot | Amazon
- Outlet extenders (may be optional – but make sure you use the exact kind that’s linked here!) – Lowe’s | Home Depot | Amazon
Materials:
- Subway tile: SO MANY OPTIONS everywhere! Here are just a few: Lowe’s | Home Depot | My black subway tile is from Floor and Decor
- Schluter strip (OR edging tile): Lowe’s | Home Depot
- Mortar – short description of types: Lowe’s | Floor & Decor
- Grout – short description: Lowe’s | Floor & Decor
Related: Looking for a MUCH more affordable and faster way to update your backsplash? Here’s how I used peel and stick backsplash over my tile.
Pssst, I’ve made some pretty fun DIY t-shirts for you or for great gifts. Check out my designs in my Etsy shop Black Door Fits!

How to Plan for Your DIY Subway Tile Backsplash
Before you actually start tiling, you need to make a few decisions about your backsplash. It’s important to plan these out in ADVANCE. This is because once you start adding tile to your wall, it’s pretty permanent. Plus, grout of any kind has a time limit, and if you realize that you missed something big, it will start to dry and complicate the entire process.
Make sure you plan your tile project with these five factors in mind:
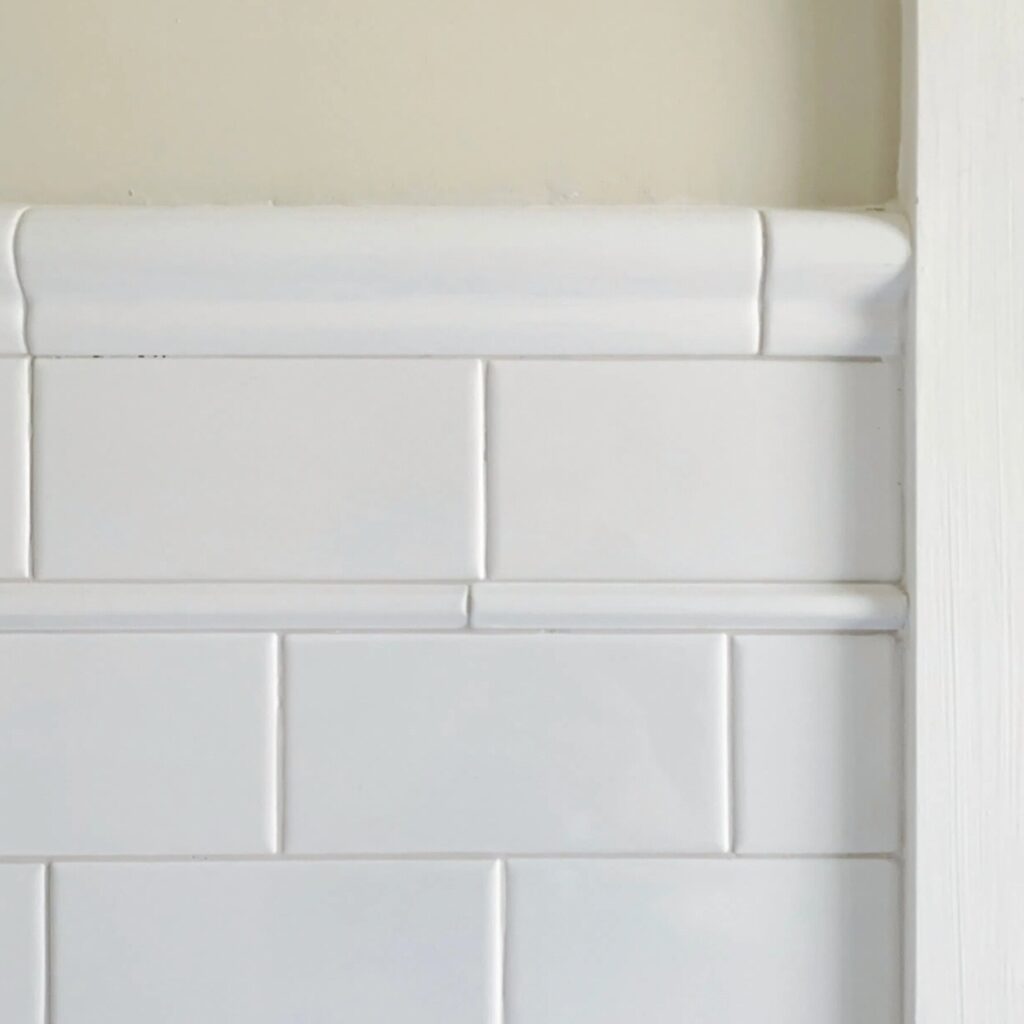
1. Tile Backsplash Edge (Schluter Strip or No Schluter Strip?)
If you’re like most people, you probably haven’t actually noticed or thought about the edge of a subway tile backsplash or what it looks like. However, it’s a pretty important part of the project.
If you don’t make a plan for the edges of your backsplash, they most likely won’t look finished. It will also be really difficult to make the tile perfectly level. Plus, even with perfectly level tile, it’s likely that your mortar and adhesive will be visible from the side.
OF COURSE, there are exceptions to this. For instance, this hexagon raw tile edge MAKES MY WORLD GO ROUND.
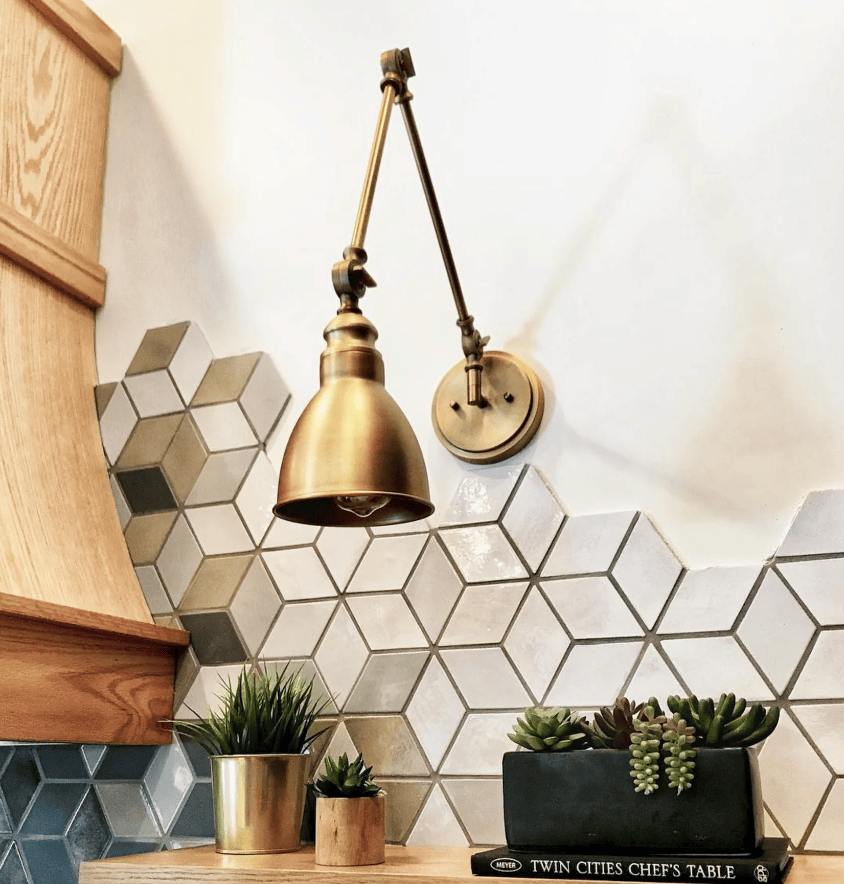
HOWEVER, that tile isn’t subway tile–it’s made with mosaic sheets, which makes a giant difference. This project may also not be ideal for your first time tiling (although I would totally go for it if it worked in my kitchen, so what do I know?).
So in general, there are two ways to edge your tile:
- Using a Schluter strip (what I used)
- Using bullnose/rounded tile
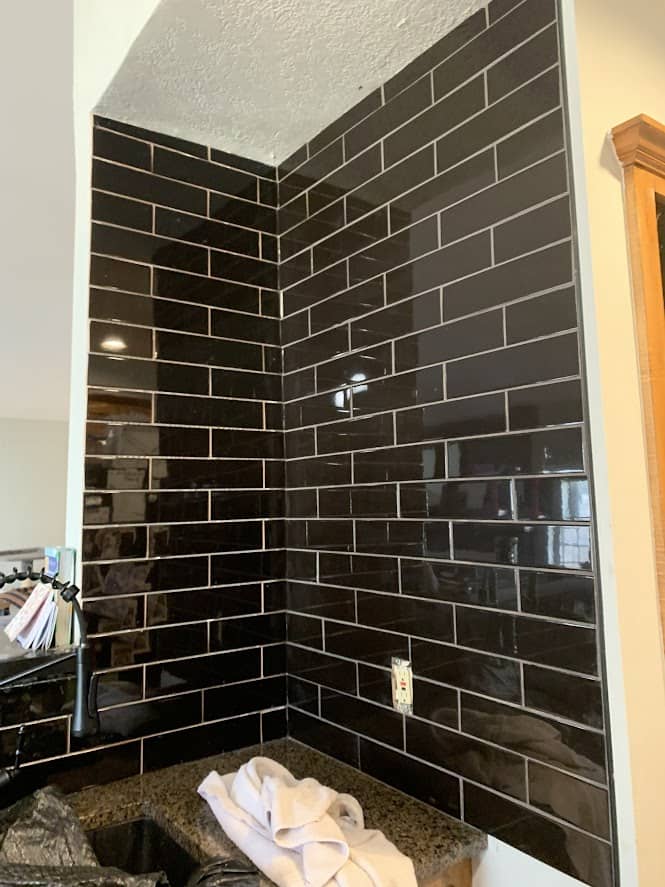
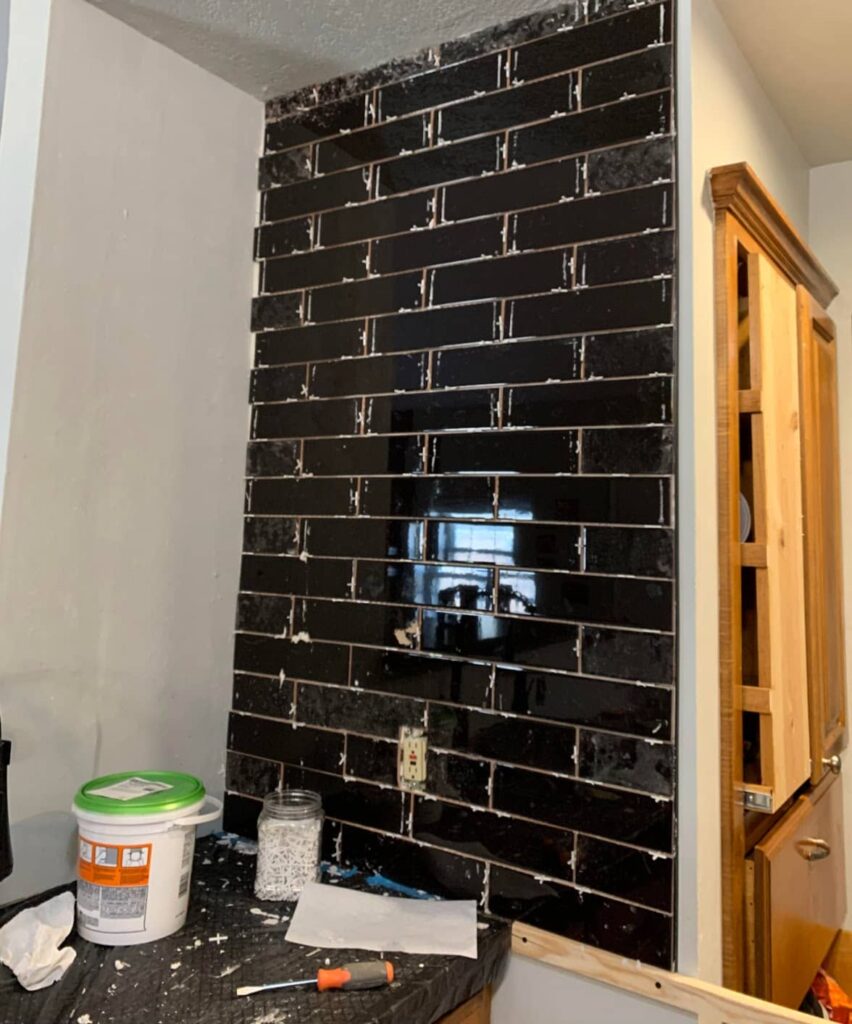
A Schluter strip is a thin piece of metal (I think it’s metal) that you install under the style to create the look of a clean edge. You can see that in the picture of my black tile above.
On the other hand, bullnose tile is rounded pieces of tile, often made specifically to go with your subway tile pieces. They’re designed to create an edge around your tile.
Here’s an example:
Since I used a Schluter strip on both of my kitchen backsplash projects, that’s what I’d personally recommend.
2. How Will You Cut Your Tiles?
Every time you tile ANYTHING, you’ll have to cut some tile pieces to fit your space correctly.
Actually, I wonder if there’s ever been a tile backsplash project where they didn’t have to make any cuts.
…Probably not, because that would have made world news.
SO ANYWAY, you need a plan to cut your tiles. Especially for kitchen backsplashes, since they tend to have more obstacles like electrical outlets, light switches, corners, windows, edges, and just weird shapes.
Since this is NOT a project where you can make cuts ahead of time, you need a way to cut tiles during the project.
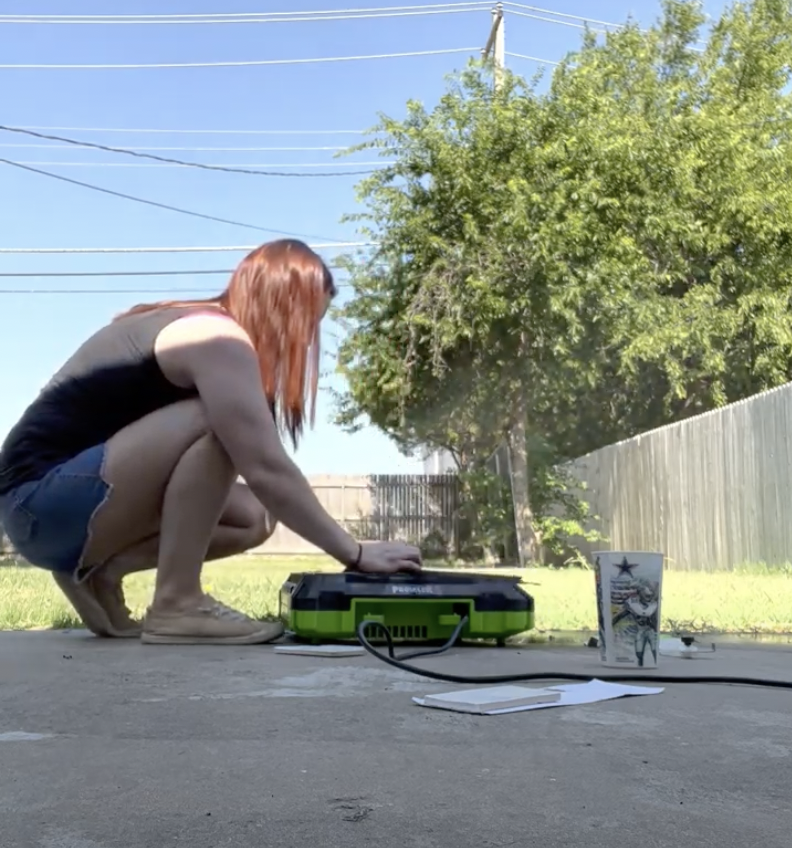
To cut tile, the best tool to use is a wet saw or tile saw. You can buy one or rent one from Home Depot or a local hardware store.
I looked at the prices of renting a wet saw vs. buying one, and it was clear in my case that buying one was the better choice. I bought this Prowler wet saw from Floor & Decor for about $50, which was less than the cost of renting one. It’s definitely not the most heavy-duty product out there, but it’s worked perfectly for two full backsplash tile jobs now!
There are also a few other notable alternatives:
- Tile snips or “tile nippers”: These almost look and function like scissors to snap tiles in half.
- Tile Cutter Kit: Essentially allows you to score and snap the tile in half.
- Angle grinder: You’ll need a diamond blade (or other blade made for cutting tile), but this is a handheld tool for trimming or cutting pieces of tile.
- Dremel: Similar to an angle grinder, it’s a handheld tool to make cuts in the tile.
Most other options may be cheaper than getting a wet saw–however, I am not sure how you could get a full kitchen backsplash done with any of them. There will inevitably be detail cuts, and it would be extremely difficult to do those without a wet saw.
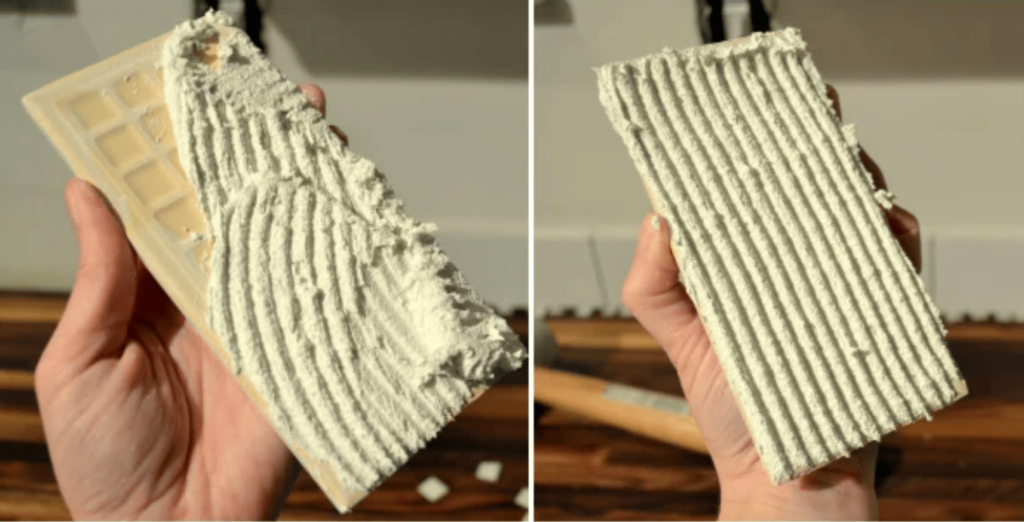
*FOR EXAMPLE,* please lay your eyes on this detail cut that my girl Jana did on her kitchen backsplash–and cry tears of joy.
THAT IS A WORK OF ART!!!!
Once you do your tile backsplash, you’ll get this.
3. Buying the Right Amount of Tile, Mortar, and Grout
You need to measure your space and calculate the square footage before ordering any of your materials.
To measure weirdly shaped spaces, just divide them into rectangles and measure each rectangle. Like this:
It’s a little bit tedious, but it’s gonna be worth it. I think running out of tile (or mortar OR grout) in the middle of this project would be enough to send me to the loony bin permanently. No thank you.
4. Color of Your Grout
This one is kind of fun! Once you’ve chosen your actual subway tile, think about the color you want for your grout. It might seem like a small thing, but the grout color actually makes a MASSIVE difference in the way the backsplash looks in the end.
5. Type of Mortar & Grout
Finally, you should consider what type of mortar and grout you’ll be using BEFORE you get started, so you can accurately plan this project and not ruin all your hard work.
For example, some adhesives require 24 hours of dry time before grouting. In those cases, you need to know in advance that if you are tiling a large area and you start at 9am on Saturday, you probably can’t actually start grouting until the afternoon the next day.
Other adhesives may be ready in a few hours–you just need to know that information before you start tackling this.
Important note: A few years ago, I made a printable document to help you accurately plan projects out. It’s called the Project Planning Printable, and you can download it through this page: How to DIY as a Mom. HOWEVER, it is now a solid FOUR years old, so take the information on that post with a grain of salt. The printable needs to be updated, but I still believe it’s valuable to have. So jump over there to download it, and I’ll let you know when an updated one is available. 🙂
I won’t lie, this is by far the most overwhelming part of this process. I’m pretty sure I need to get a Bachelor’s degree in chemistry to fully understand all the different types of thinset vs. mastic vs. mortar….. And chemistry happens to be my least favorite school subject of all time. So like, I won’t be getting into cellular structures today. I’m so sorry to disappoint.
I recommend going to your local hardware/flooring store and asking for a professional to help. I live about 30 minutes from a Floor and Decor, and it’s a drive I’m willing to make when I have questions. They gave me really great answers and led me to the right kinds of both products.
Of course, not all workers have the same level of experience, so don’t be afraid to ask other professionals (even if you have to go to another store) if you’re not confident about what they say.
*ahem* As a 4 foot 11 woman who looks like she’s 15 and often gets weird looks from these hardware store guys, I know that situation WELL.
Just as a reference, I used Mapei Type 1 tile adhesive, and Mapei Flexcolor grout.
One thing I did learn is that if you have ceramic or glass subway tile, you need to use UNSANDED grout. Sanded grout has actual sand in it, which scratches ceramic or glass tile.
…Do I get a chemistry degree now?! I think I’ve earned it.
Related: How to Paint Countertops Like Granite – Granite isn’t exactly in style like it used to be, but there is a lot of important info in this post if you’re considering painting your countertops. It’s not nearly as intimidating as you might think!
Since this project, I’ve also used epoxy to makeover countertops. Here’s my full review of Stonecoat Countertop Epoxy. (Summary: EHHHH)
11 Steps to Install Your DIY Subway Tile Backsplash
When it’s finally time to tile, here are the 11 steps you’ll follow:
1. Prep Your Kitchen for Tile
Who are we kidding, when is this NOT the first step of any project?
Here are all the ways that you need to prep your kitchen for a new tile backsplash:
- Remove any old tile or existing backsplash
- Repair or replace drywall
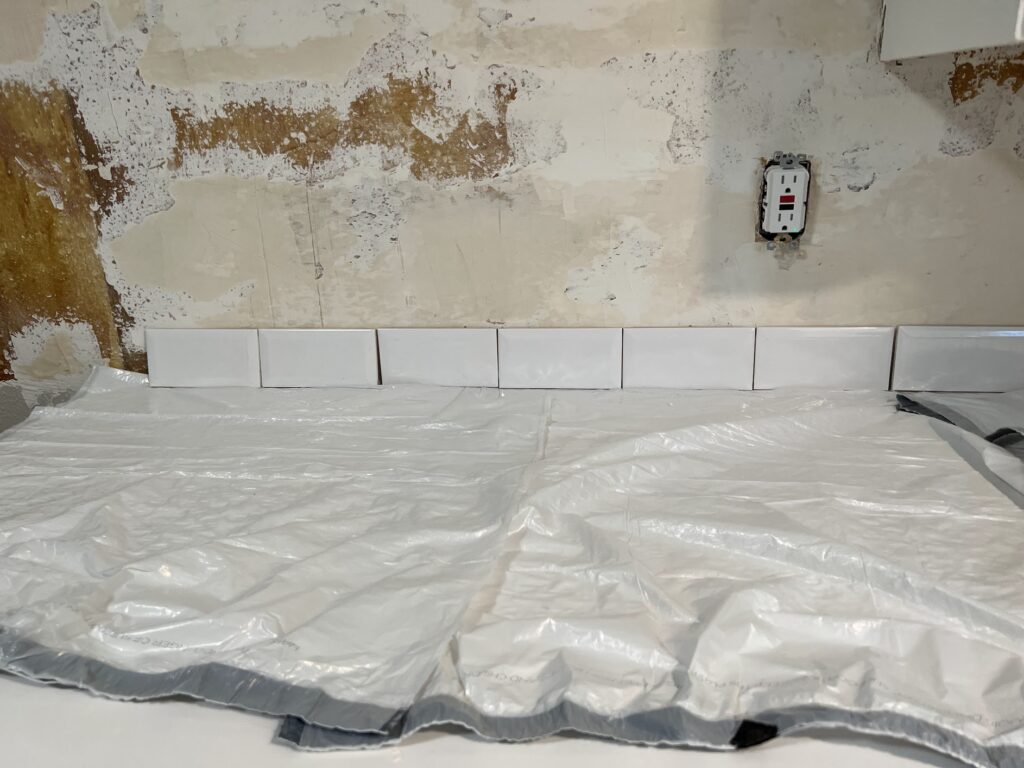
- Cover ALL surfaces under the space you’re tiling with plastic or trash bags
- Set up your wet saw outside (and make sure to practice using it!)
- Determine the general spacing of the tile (more on this below)
- Cut one or two tiles in half (specifically for the subway tile design)
- IF you’re tiling anywhere that isn’t sitting on a counter, add a support block
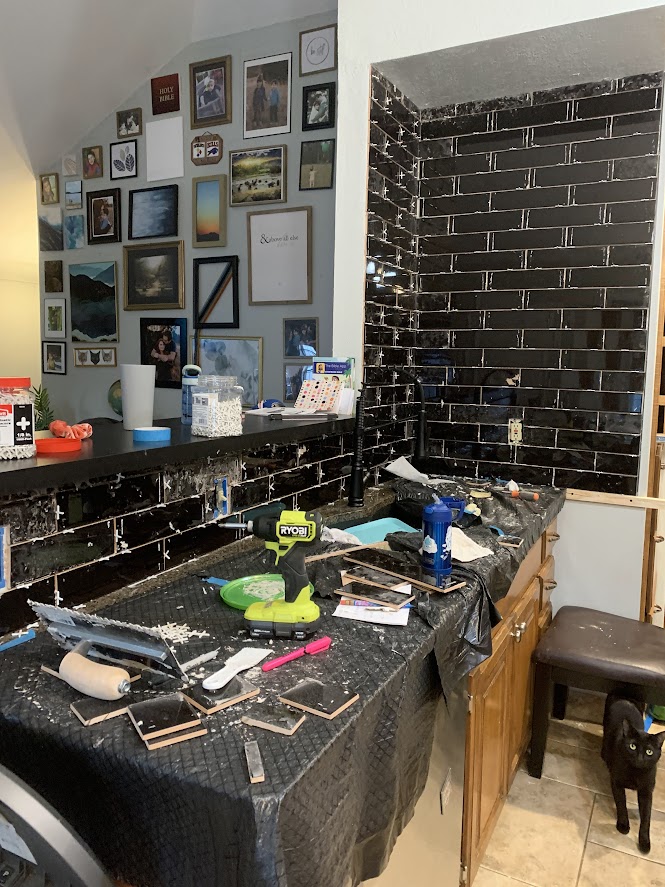
Important note: Cover E.V.E.R.Y.T.H.I.N.G. because this project is MESSY. IT’S SO MESSY. And there’s just nothing you can do about it. In fact, don’t even try to stop or minimize the mess–it wastes your time. Just prep for it. If you cover everything well enough, at the end you can just scoop up all the plastic, instead of spending 20 additional minutes scraping dried mortar.
Now, let me expand on those last few bullets.
First, right before you actually open up the adhesive, dry fit the first row of your tiles. This means just place the dry tiles on your counter to get any idea of how they’ll fit the space.
It’s not going to be perfect, but this will help you figure out the best place to actually start with your tile.
If you don’t plan ahead for this, you might end up having a bunch of awkwardly-sized slivers on one end, which is an eyesore.
After that, measure the width of one tile and calculate the halfway point. Cut one or two tiles in half, so you’ll have FOUR half-sized tiles.
Since subway tile is placed with each row shifted from the row underneath, you’ll have to start with a half-sized piece on the end.
HOWEVER, here’s a lesson I learned about this: DON’T cut more than two tiles in half at the very beginning, because you are more likely to waste them.
Case in point: when I did my backsplash tile, I had this tall vertical space to fill. So I cut about eight tiles in half so that I would have plenty of half pieces to start at this end. However, in the end, I had TOO MANY half-sized pieces, and not enough full-sized pieces to make exact cuts with.

Another important lesson: Finally, make sure you add a support piece in any spot that isn’t sitting on a counter. Without something for your tile to sit on, gravity will pull your pieces down and ruin all the work you do to make them level.
Plus… like… the entire wall will be ruined. So let’s not do that.
But it’s easy enough. This support piece does NOT have to be super strong at all. You can use nails or just screw in the drywall–in fact, I almost used a paint stirrer as our support piece. It doesn’t have to be strong, just needs to add a ledge for a few pieces of tile.
Related: I wrote a full guide (with a video!) to show you how to nail boards into a wall with AND without drywall. It’s useful especially for accent walls, or when you aren’t sure whether to use a nail or screw or how to hang something up.
NOW you’re ready to open up that adhesive! Well, read the next section first. But you’re REALLY close. 😉
2. Measure, Cut, and Install Schluter Strip
Of course, this step will change if you choose a different method of edging your tile. But if you use a Schluter strip, follow along.
This is when it comes in handy that you placed your tile. Placing your tile should show you exactly where to start adding tile, so mark that spot to add the Schluter.
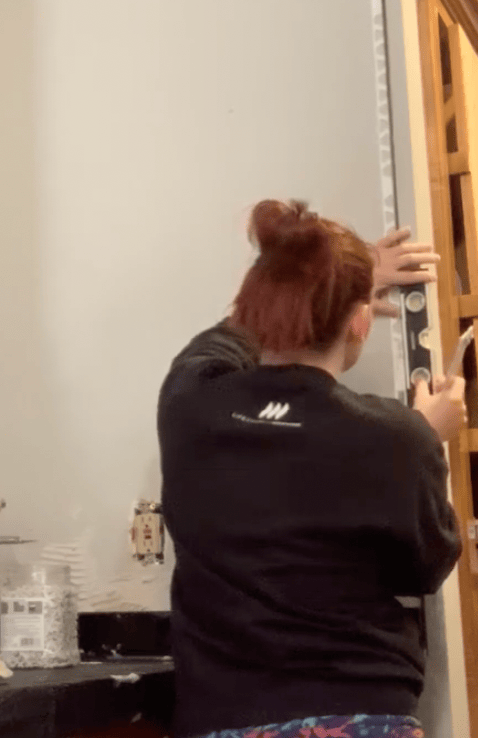
Schluter strips are often around 8 feet long, so you’ll have to cut it to the right height for your backsplash. I used my miter saw to do this the first time, and a wet saw the second time. Both options work well.
Now, I added about four Schluter strips in two different kitchens before I finally figured out how to install it right. And in the end, it’s actually the simplest way:
Just add adhesive to the wall (being particular about where you are adding it) OR add adhesive to the back of the Schluter strip, then stick it onto the wall.
THEN, don’t forget to check if it’s vertically level. Then check again. The Schluter will stick to the wall with the adhesive, but it also slides around way too easily. SO, for that reason, this is how I’ve finally figured out how to do it:
- Add the adhesive and the Schluter strip to the wall
- Check that the strip is level and adjust if needed
- Add the bottom piece of tile to the wall and add spacers
- Add the first vertical row of tile against the Schluter strip
- Re-check the level again
- Adjust the strip and first row of tile (if necessary) BEFORE the adhesive hardens
The first time I installed a Schluter strip, I tried screwing/nailing it into the wall. But that makes no sense because you still need to somehow add adhesive behind the strip. PLUS, the screws/nails never actually held the strip on… in the end, it just made the process more awkward.
Instead, by adding the first vertical row of tile at the same time that you install the Schluter strip, it basically locks everything into place.
Important lesson I learned: A laser level will simplify this process as much as possible. How do I know that? Because I packed my laser level when I tiled my friend’s kitchen, and then forgot it until the last row of tile. And realized how much effort I could have saved myself. Sigh.

Another cool thing about Schluter strips is that you can add them horizontally as well! Here’s what that looks like on my friend’s white subway tile:
3. Add the Bottom Row of Tile First
Finally–time to start laying your tile!
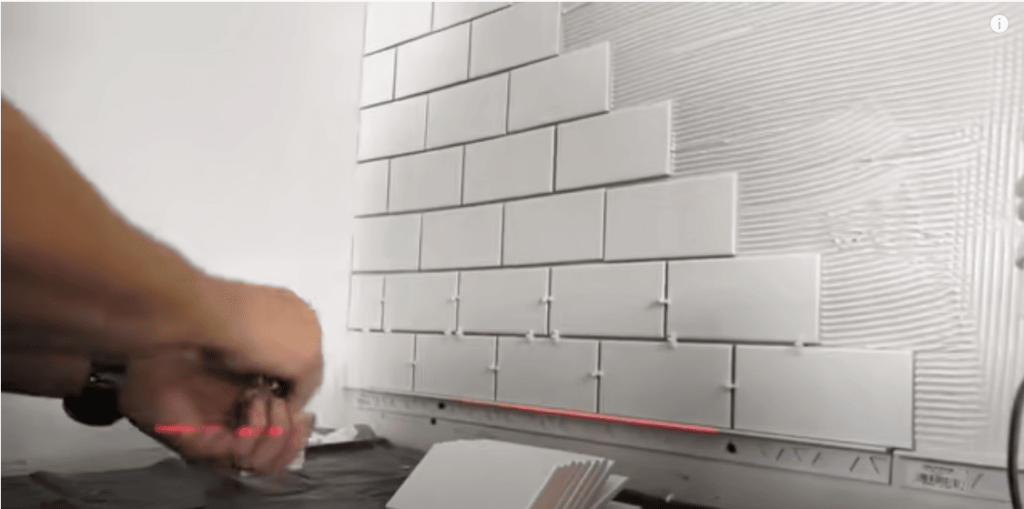
I’ve seen a lot of people on Youtube apply their subway tiles in sections, like Home Renovision below (my favorite Youtube DIYer). We also started doing that in my friend’s kitchen, BUT there are a few good reasons why I don’t recommend it.
Fun (actually not so fun) fact: Houses aren’t level or square. In fact, most of the walls in your house right now are probably janky as all get out–you just can’t tell until you’re trying to glue perfectly straight things to them.
As we were laying tile pieces in sections, we quickly realized that the countertop wasn’t perfectly level.
This is actually the second time I’ve been doing a kitchen project for a friend and found that the counter wasn’t level. That was an epoxy marble countertop–very different situation, but it’s VITAL to know about it in both cases.
But since we’d already installed a section, we couldn’t just keep adding full tiles to the bottom row. It would have made the entire subway tile backsplash crooked.
What I ended up having to do was trimming a small amount off of the bottom of every bottom tile in this row.
In the end, you can’t tell that anything is off, so it’s not necessarily a problem. However, it did cost us additional work and time that wouldn’t have been necessary if we had laid the bottom row first.
Important note: When you apply an individual row like this, it’s best to NOT add adhesive directly to the wall. If you try to do that, you’ll inevitably add too much, then the adhesive will dry too quickly.
Instead, you’re going to “back butter” the bottom row of tiles. This means that you’ll add adhesive to each individual tile, then add them to the wall.
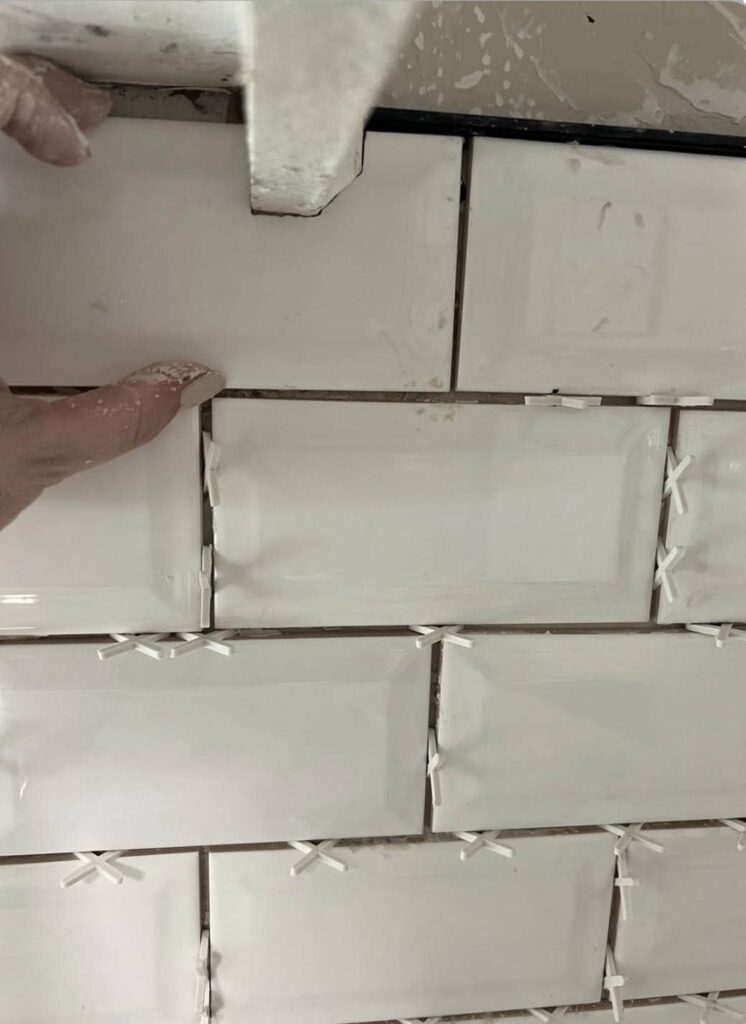
4. Don’t Forget Your Spacers!
Get in the habit of adding spacers ALL AROUND each tile as you go.
This especially includes UNDER your bottom row of tiles. You do not want your backsplash tiles to be sitting directly on your counter, because this leaves them no wiggle room to expand and contract as they naturally will. More on that below.
You can add spacers after each tile OR after every 2-3 tiles. Just make sure you do it within 2-3 minutes of adding new tiles to keep all spacing perfectly consistent.
5. Add Tiles in Sections
Once your first horizontal row is in (and potentially one vertical row, if you used my Schluter strip technique), you can add adhesive to one section of the wall and start placing your tile. Don’t forget your spacers!
Just make sure to add adhesive in relatively small sections so that you can add the tile as quickly as possible. Many tile adhesives/mortars/thinsets start drying within 10 minutes! You don’t want to add too much mortar to the wall and then have it dry before you add tile.
I know when you watch pros on Youtube, they may add larger sections at a time. For newbies though, think small.
Plus, as I briefly mentioned above, there are inevitably multiple spaces where you’re going to have to cut the tile in weird shapes (like around outlets or trim). For those areas, back buttering might be the easiest way of adding adhesive.
This part can actually go pretty quickly! But if it’s your first time tiling, take your time. It’s repetitive, and it may take some time to get into a groove.
Extra Tip: How to Tile a Backsplash Corner
Most kitchen backsplashes have at least one corner that you’ll need to tile. Before I started my first tiling project, this was one of my biggest concerns and questions: How do I tile in a corner?!
But in reality, tiling the corner is not really much different than the rest of the project.
The only notable thing is that you’ll have to cut each of your tile pieces on the end to fit the space left. These spaces will most likely be odd sizes, so you’ll have to measure each space individually and make the cut.
After you cut the tile, test that it fits correctly WITH SPACERS before installing it with tile adhesive.
At the very end of the project, you’ll add caulk to the corner. So fear not if the tile piece you cut looks just a little bit too small–it will be disguised with caulk.
In general, too small in the corners is better than too big in the corners.
But as a reference, here’s a piece of my corner that was WAY too small:
Honestly, it’s not very noticeable since it’s up high in a corner, but it was definitely a mistake. But one you can learn from. 🙂
(If you want to see more of my mistake-friendly content, find me on TikTok and Instagram.)
6. Let the Adhesive Dry for the Required Time
After all of your tiles are in, start by DOING A HAPPY DANCE.
Then admire your handiwork! Now you need to let them sit until the adhesive is fully dry.
This amount of time depends on the actual mortar/thinset that you use, so check your container for those details.
Important note: Even if your thinset dries REALLY quickly, I strongly recommend planning for your kitchen backsplash to be a two-day project. MINIMUM. Even though none of these steps are particularly challenging, it’s still an active and time-consuming DIY project, and I’m TIRED after a day of tiling.
7. Remove Spacers When Adhesive is Dry
The next day, when your tile adhesive is dry, you can remove all the spacers from your tiles.
Most of them will be easy to pull right out, but some will probably stick to the mortar and tear in half. You’ll be left with tiny little pieces sticking out of the mortar, but they’ll come out easily with pliers.
Put all the spacers that don’t rip back in the container–there’s no reason you can’t reuse them!
Important note: ALSO, at this time, use your steel putty knife to scrap any dried thinset off the surface of your tile. You do NOT want to wait any longer to do this.
8. Grout Time
Time to fill those grout lines! If I were to summarize this step in one sentence, it would be this: shove the grout in the cracks with a grout float.
You’re going to work on one section at a time, then you’ll use a damp sponge to wash the grout from the surface of the tile. This step just requires a loooot of elbow grease.
Then, about an hour or so later, you’ll take the sponge and do a more thorough clean of the subway tiles. Since the grout should be hardening by this point, you’ll clean up the grout lines more.
I’m going to write a separate blog post about grouting, because I have a lot of thoughts and tips on it. Keep your eye out for that!
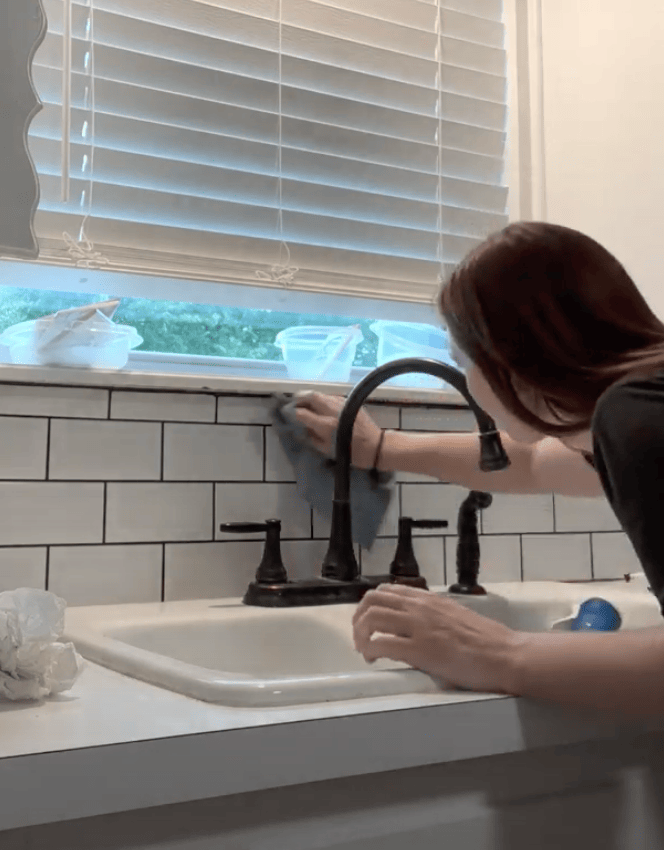
9. Buff the Tile
I technically consider buffing the tile to be part of the grouting process, but I’m going to include it here because it’s so important.
“Buffing” sounds really intense, but this step is really just a final clean-up of the tile surfaces. Most subway tile is ceramic or glass, so it should be glossy.
But even after all of the grout is off the surface of the tiles, the leftover residue will leave a “haze” that makes the tiles not look shiny and pretty. You can see it here:
So buffing is just wiping off that residue and shining it up. It takes a little bit of time because you want to make sure you get every inch of the tile, BUT it’s not hard.
In fact, I’ve seen SO many different & extremely simple recommendations for products to buff the tile. I think I’ve used different products both times I tiled. Here are 7 different products you could use to buff brand new tile after grouting:
- Scrubbing pad
- Microfiber cloth
- Terrycloth towel
- Old t-shirt (or a new one–I mean, you do you, boo)
- Cheesecloth
- Blue shop towels
- Wipe with white vinegar
There are many other products that are made for cleaning haze, but any of these simple products will work if you clean the tiles correctly.
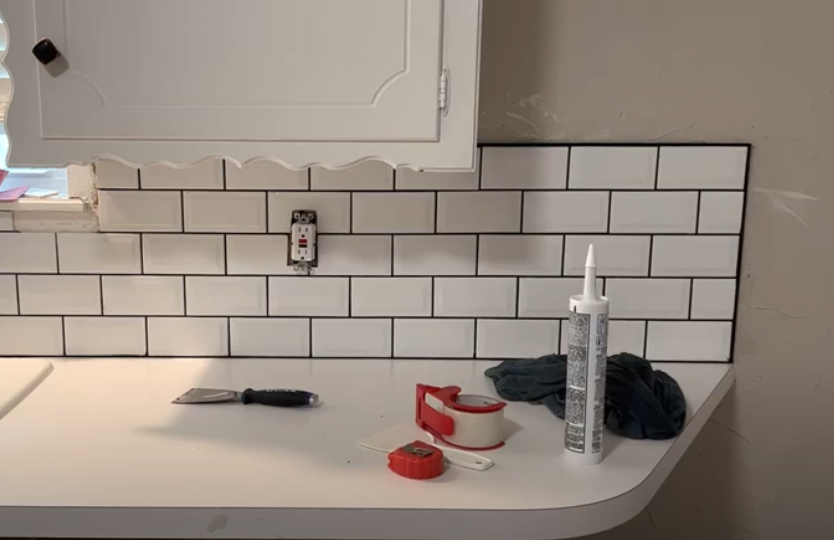
10. Caulk the Edges & Corners
You’re almost done! The FINAL step of your kitchen backsplash is adding caulk. Caulk is almost always one of those finishing touches that makes alllllll the difference in the final product.
Make sure that you find caulk that matches your grout! It’s going to look noticeably weird if you have light gray grout and white caulk (or any other combination of colors). Unfortunately, the colored caulk is more expensive than regular caulk, but it’s worth it–I promise!
This is the kind of caulk I used, because it matches the grout color exactly.
Other than the final look, here’s the main reason why caulking your backsplash is important:
Over time, your kitchen and walls are going to expand, contract, and shift with gravity and with the weather. Grout, while it’s extremely effective and long-lasting, does not naturally expand and contract.
But caulk does.
In the corners and the places where your tile meets the counters and the upper cabinet, caulk allows much more flexibility for those spaces. This way you won’t have any cracks in your beautiful work.
Important lesson learned: Some of the dyed caulks are SUPER pigmented, and they just seem much messier than regular caulk. I have no idea if this is scientific, but my brain says it’s true. If you want to avoid *another* huge mess, try adding painter’s tape to your counter when you caulk, or use this caulk applicator. I’ve tried other caulk tools and they are no good, but this one works the best.
11. Bonus Note: Installing Outlet Extenders After Tile Work
After you install your kitchen subway tile, you may go back to put your outlet covers back on, only to realize, OH CRAP. THEY NO LONGER FIT.
The tile adds some depth to your wall, so now the outlets are sitting too far back.
The good news is that there is a super easy solution for this, and it’s called an outlet extender. Except, it has to be THIS KIND of outlet extender, not the 14,283 other types on the market. Those are just confusing.
Here are the correct links for those again: Lowe’s | Home Depot | Amazon
With these, all you have to do is add them behind your outlets, then install them as usual.

I do have a video planned with a video of this, so make sure you’re on my TikTok & Instagram!
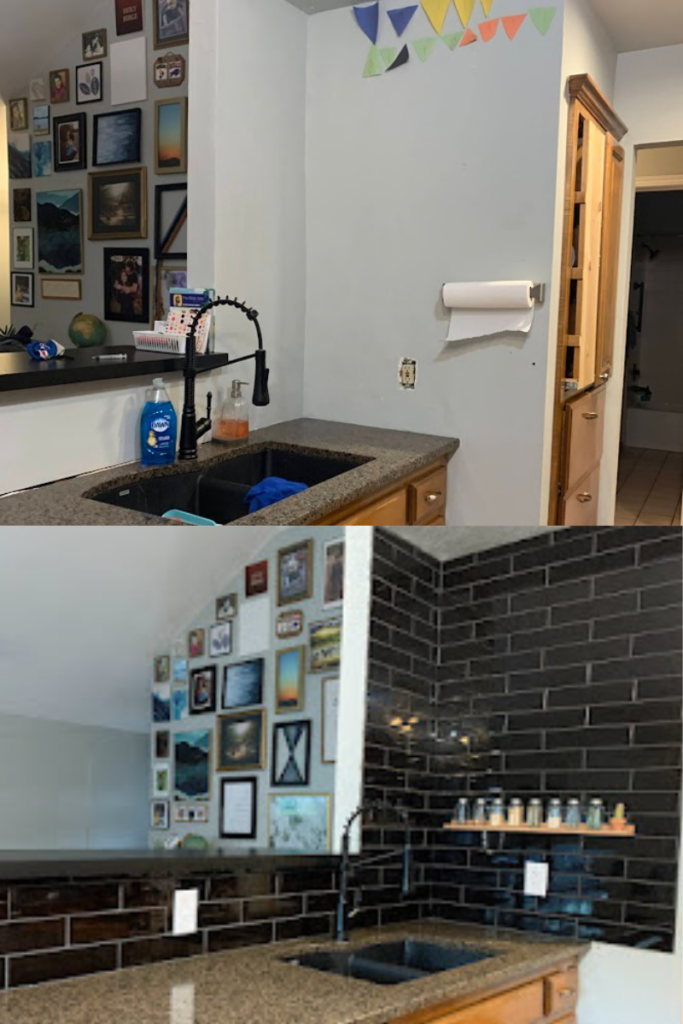
Subway Tile Backsplash Before and After: White Tile & Grey Grout
Here is the final result of my friend’s new white kitchen:
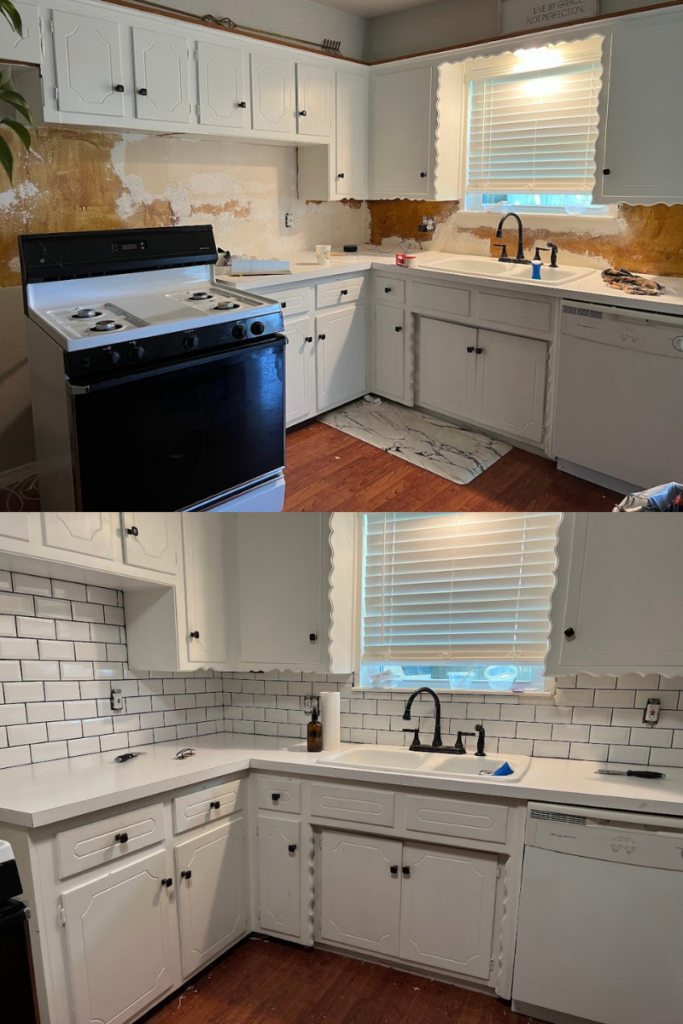
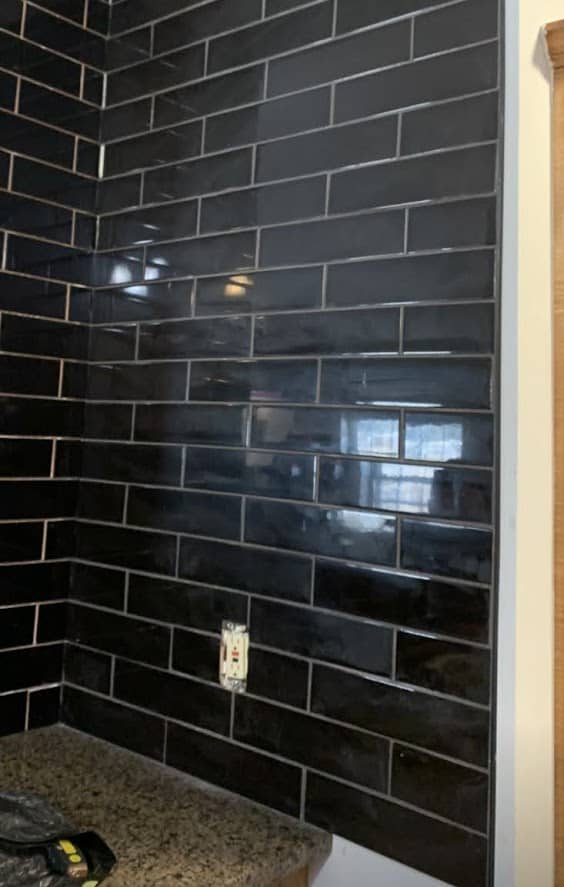
Subway Tile Backsplash Before and After: Black Tile & Gray Grout
And here is my black subway tile kitchen transformation:

This kitchen is far from done–I still need to paint the cabinets and update all the hardware, which I’m hoping to do this winter. If you’re looking for tips for that, read all about how I’ve done it in the past: General Finishes Milk Paint Review
Related: I also made over my previous 1940’s kitchen for under $400. See that full Kitchen Makeover on a Budget
I hope this post was helpful! I work really hard to include every possible detail and encourage you to GO FOR IT. Every project presents unexpected challenges–that’s just part of the DIY life, and we have to appreciate that.
I’m always happy to answer any questions you have or celebrate your tiling wins with you. Find me through email, on TikTok, or Instagram, and let’s chat!
Related: Want another way to make your home reflect YOU–for insanely cheap prices? Check out my printable wall art on Etsy in the Black Door Shop. You can even get 20% off your order with the code 20OFF. 🙂

More fun posts: