 Woah, sorry, that was probably too intense.
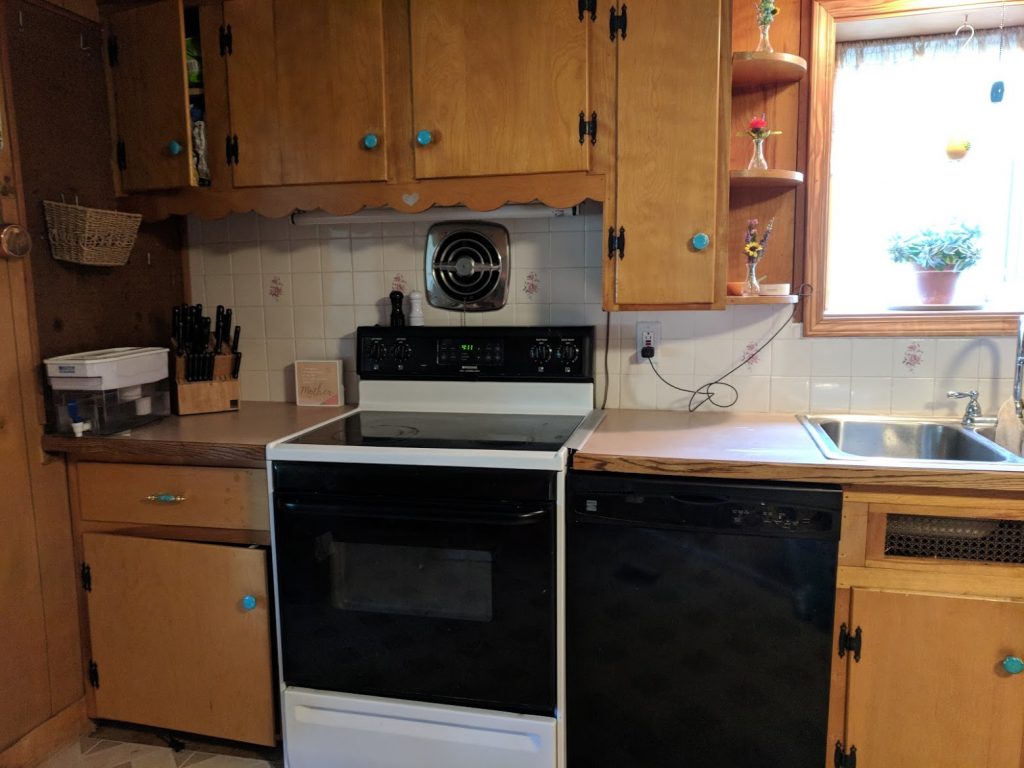
This kitchen is from 2017, when my husband, daughter, and 38-week pregnant self were flat broke and bought this extremely old and dated house. I had no money and no DIY skills whatsoever, but I did have some creativity and DESPERATION to make updates.
In the end, I did a surprisingly solid job of completely making over the entire kitchen for under $400. See the full before and afters here: Complete Kitchen Makeover on a Budget.
The first thing I had to do something about was the terrible existing backsplash.
Woah, sorry, that was probably too intense.
This kitchen is from 2017, when my husband, daughter, and 38-week pregnant self were flat broke and bought this extremely old and dated house. I had no money and no DIY skills whatsoever, but I did have some creativity and DESPERATION to make updates.
In the end, I did a surprisingly solid job of completely making over the entire kitchen for under $400. See the full before and afters here: Complete Kitchen Makeover on a Budget.
The first thing I had to do something about was the terrible existing backsplash.
Related: Want another way to make your home reflect YOU–for insanely cheap prices? Check out my printable wall art on Etsy in the Black Door Shop. You can even get 20% off your order with the code 20OFF. 🙂
Easy DIY Backsplash Options
At the time, tearing the backsplash out and replacing it was completely out of the question for every possible reason. In addition, the primary goal was to update my backsplash for as little possible money. Basically, the two most affordable backsplash options are:- Painting the tile
- Applying a peel and stick backsplash over the tile
How to Choose Peel and Stick Tile for a Kitchen
Now, there are so many options for peel and stick tile. I spent HOURS of my life scrolling and scrolling through every one… like I do before I make like 93% of my purchases (I think it’s a disease). I quickly found that most brands didn’t specifically state that their tiles could withstand heat or be placed over existing tile. After I actually worked with the product, I believe any brand would probably work over existing tile as long as it’s relatively smooth. However, it’s a KITCHEN. So being heat-friendly was pretty important. I ended up choosing Tic Tac Tile for this reason, and because they had so many pretty options.
It was a bonus that I could order through Amazon and get them within two days. Your girl was ANTSY.
I ended up choosing Tic Tac Tile for this reason, and because they had so many pretty options.
It was a bonus that I could order through Amazon and get them within two days. Your girl was ANTSY.
Supplies for Peel and Stick Backsplash:
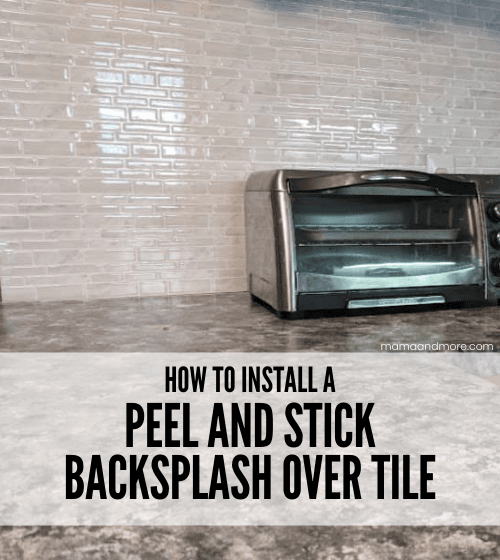
How to Apply Peel and Stick Backsplash Over Tile
Step 1: Clean the Tile
Like almost every other DIY project, the first step is to start with a clean surface. Since this was in the kitchen, you need to make sure there’s no grease sitting on your tile. If I were to do this project today, I’d use diluted TSP to clean off my tile. At the time, I scrubbed my tile with a scrubbing pad and Norwex cleaning paste, then I went over the tile again with a rag and a water-vinegar mixture. Honestly, I had no idea what I was doing and I really expected the cleaning part to be a lot more difficult. When I hear “scrub your tile,” I get intimidated. I’m picturing Cinderella sweating and crying and the evil stepmother’s voice saying “GET ALL THE GREASE OFF THAT TILE CINDERELLA!” …But in reality the “scrubbing” part went super fast, so then I used vinegar to make myself feel like I did something. Then I ALSO used sandpaper, but only because I had it in the room and it was the quickest and easiest sandpaper job ever. Theennn, finally, I just wiped it all with a microfiber cloth and was done with the cleaning part! Reading all of those directions was more difficult than actually doing it… probably five minutes total.Step 2: Placing the Backsplash Tiles on the Wall
Once your existing tiles are totally dry, you can start moving forward. Here’s what the Tick Tac Tiles look like, straight outta the package: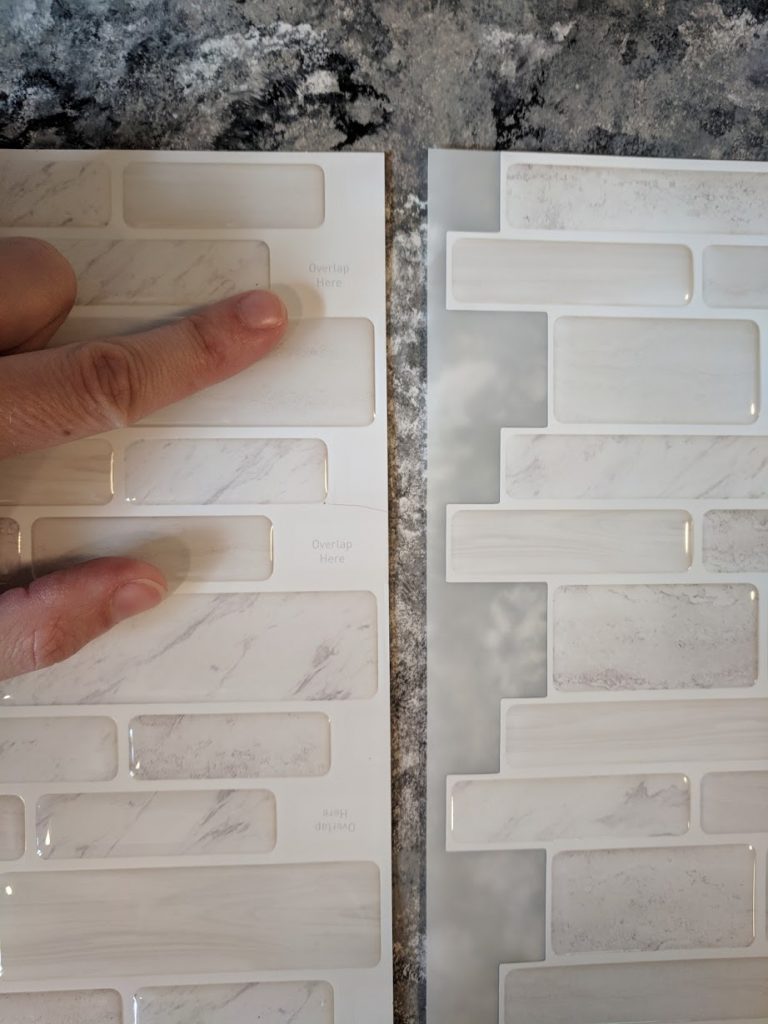 Now this is where, if you haven’t already, you’re going to question my sanity.
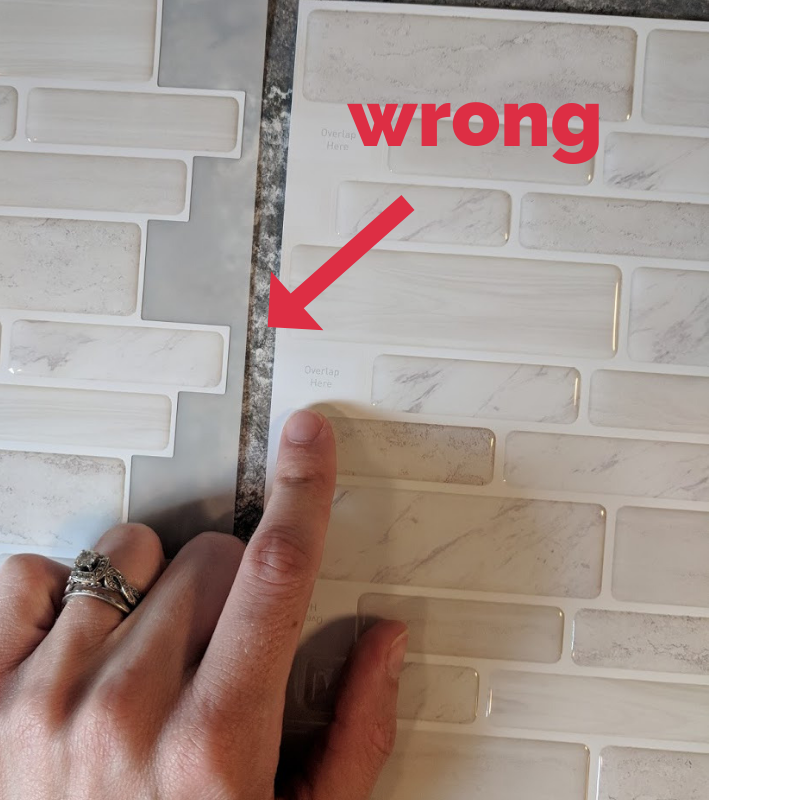
You can see in that picture, on the left side of each tile, it says “overlap here.” I saw this in the beginning. I promise I did.
But I didn’t check and I didn’t think it mattered which direction those overlap signs went. So… of course I applied them the wrong way. This is after I put the first two down:
Now this is where, if you haven’t already, you’re going to question my sanity.
You can see in that picture, on the left side of each tile, it says “overlap here.” I saw this in the beginning. I promise I did.
But I didn’t check and I didn’t think it mattered which direction those overlap signs went. So… of course I applied them the wrong way. This is after I put the first two down:
 Sure, it looks promising. But those two took me FORTY FIVE MINUTES and a considerable part of my dignity. I was so frustrated.
But you know why? Because this is actually the easiest project known to mankind and I found the ONLY WAY to mess it up.
These days, four years after this project was done, I call myself “the CEO of doing things the hard way.” And this is why. 😛
So here’s the no-brainer way to avoid the only possible mistake: Look at the overlap sign, and don’t put them on this way.
Sure, it looks promising. But those two took me FORTY FIVE MINUTES and a considerable part of my dignity. I was so frustrated.
But you know why? Because this is actually the easiest project known to mankind and I found the ONLY WAY to mess it up.
These days, four years after this project was done, I call myself “the CEO of doing things the hard way.” And this is why. 😛
So here’s the no-brainer way to avoid the only possible mistake: Look at the overlap sign, and don’t put them on this way.
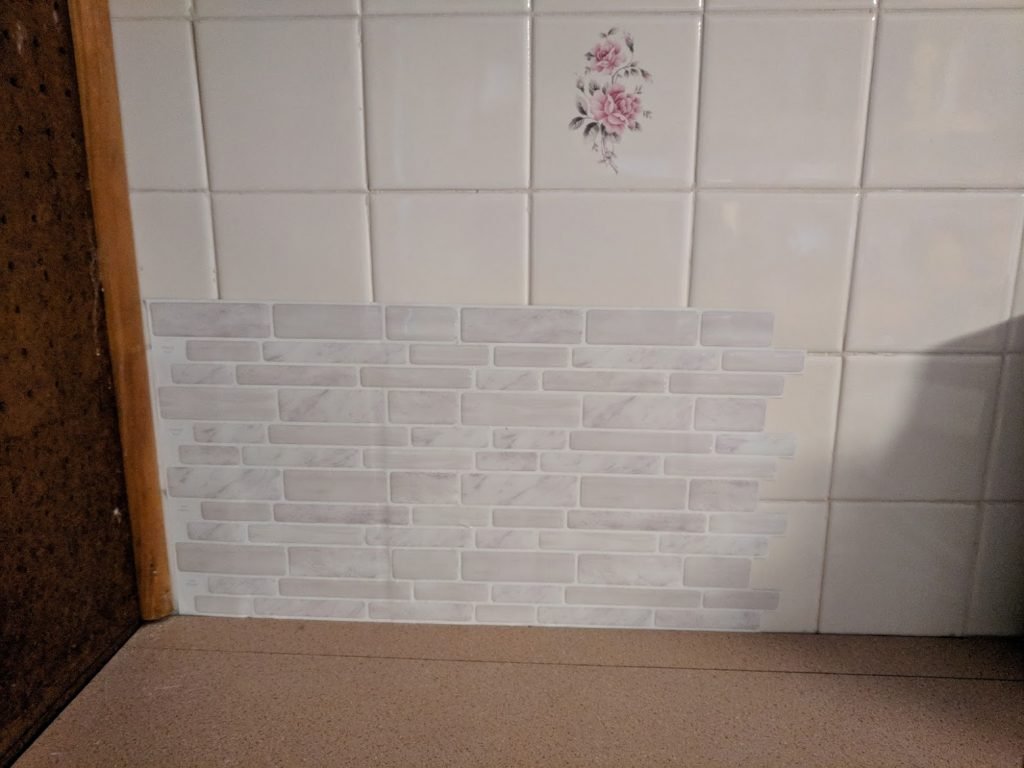
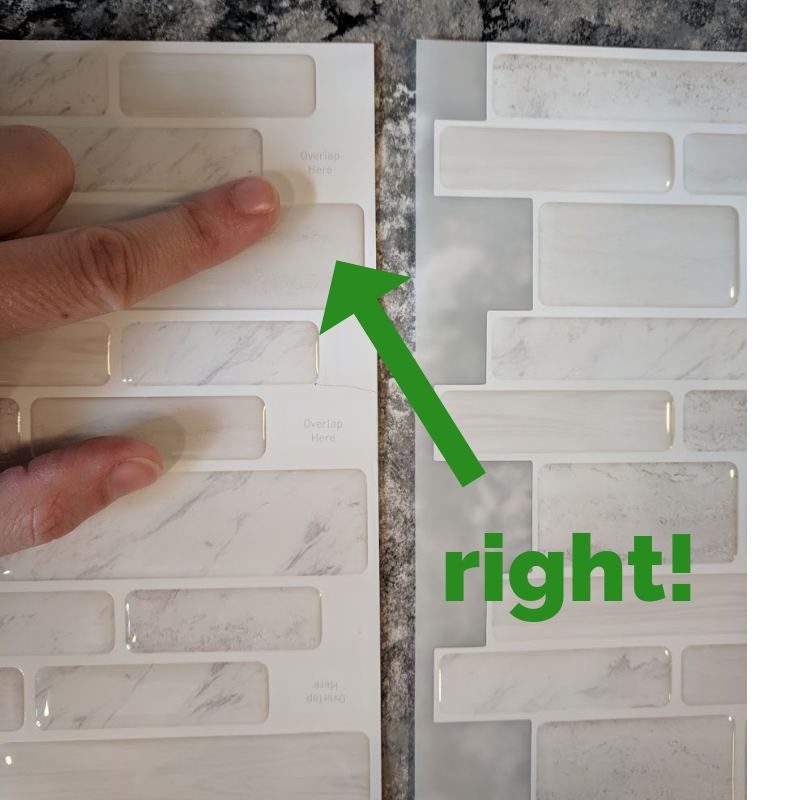
 The part that says “overlap here” is actually going to go on your wall, so make sure you’re place that one down first. Just like this:
 Make sense?
Anyway, when I finally realized what was going on, I was miraculously able to salvage this whole project. After swearing at myself on the inside a few times.
The tiles do come off after you apply them, but it can bend them. If you have to lift yours, try using a blow dryer to heat them up and keep the sheets smooth.
When you apply them correctly, unlike me, the process is extremely fast and easy.
Don’t forget to check your progress with a level periodically to keep everything flat! 2018 Kaylee did not, of course, but you should. 🙂
Make sense?
Anyway, when I finally realized what was going on, I was miraculously able to salvage this whole project. After swearing at myself on the inside a few times.
The tiles do come off after you apply them, but it can bend them. If you have to lift yours, try using a blow dryer to heat them up and keep the sheets smooth.
When you apply them correctly, unlike me, the process is extremely fast and easy.
Don’t forget to check your progress with a level periodically to keep everything flat! 2018 Kaylee did not, of course, but you should. 🙂
 When you get to edges or weirdly shaped areas, all you have to do is use scissors to cut your peel and stick tile sheets. The “grout lines” are similar to paper, so it’s extremely easy to cut around the stone pieces. As you can see, I also cut straight through the stone lines to finish off the edges.
Step 3: Caulk the Edges
Fun fact: 2018 Kaylee didn’t even know what caulk was. I’m not kidding. But you, as a 2022 reader, should caulk. It’s going to make the bottom and side edges look much more professional. But *cough cough* it doesn’t take much to make things look more professional than this…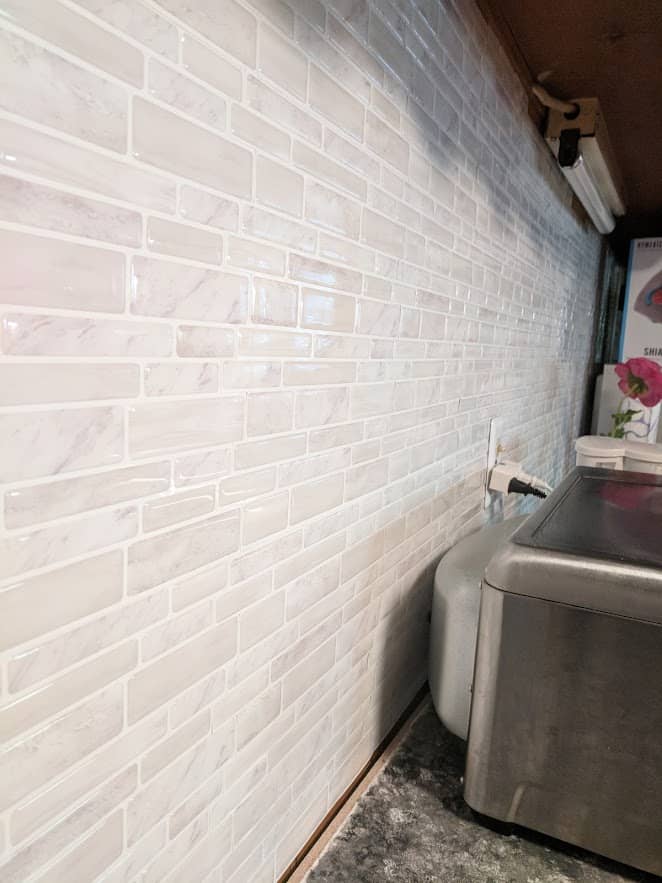 Ohhhh, 2018 Kaylee. You have so much to learn.
I actually have a lot more thoughts and jokes about caulk (like, how do you pronounce it? Have you ever asked for it in the hardware store? Maybe don’t.)–but I’ll spare you today. 🙂
Ohhhh, 2018 Kaylee. You have so much to learn.
I actually have a lot more thoughts and jokes about caulk (like, how do you pronounce it? Have you ever asked for it in the hardware store? Maybe don’t.)–but I’ll spare you today. 🙂
Peel and Stick Backsplash Pros and Cons
Peel and stick tile has grown in popularity since I originally did this project. If you’re evaluting whether peel and stick is the best choice for your kitchen backsplash, let’s look at some perspective. Excluding painting your tile, the other option for upgrading a kitchen backsplash is to remove tile and replace with glass or ceramic tile. The peel and stick tiles cost me under $100 and took 2 hours. The “prep work” was basically non-existent. The result looked ALMOST real, held up to heat, and the surprisingly strong adhesive wasn’t coming down any time soon. On the other hand, removing and installing a tile backsplash is undeniably a much more involved project. You need a lot of tools, at least a few days, and the costs are going to be much higher. If you choose to hire someone, it will increase costs even more. However, the end result is extremely durable and extremely professional. In addition, there are thousands upon thousands UPON THOUSANDS of options of ceramic tiles or backsplash sheets–you can completely customize the look and feel of your kitchen. Peel and stick backsplash sheets still give you options, but not nearly as many.| Pros to peel and stick tile | Cons to peel and stick tile |
|
|
Result: Peel and Stick Backsplash Tiles
In the end, this took 3 hours because of my mistake. But if you follow these instructions or just don’t make the same mistake I did, it would probably take half that time. Installing peel and stick tile backsplash is EXTREMELY easy. Here’s the backsplash before and after: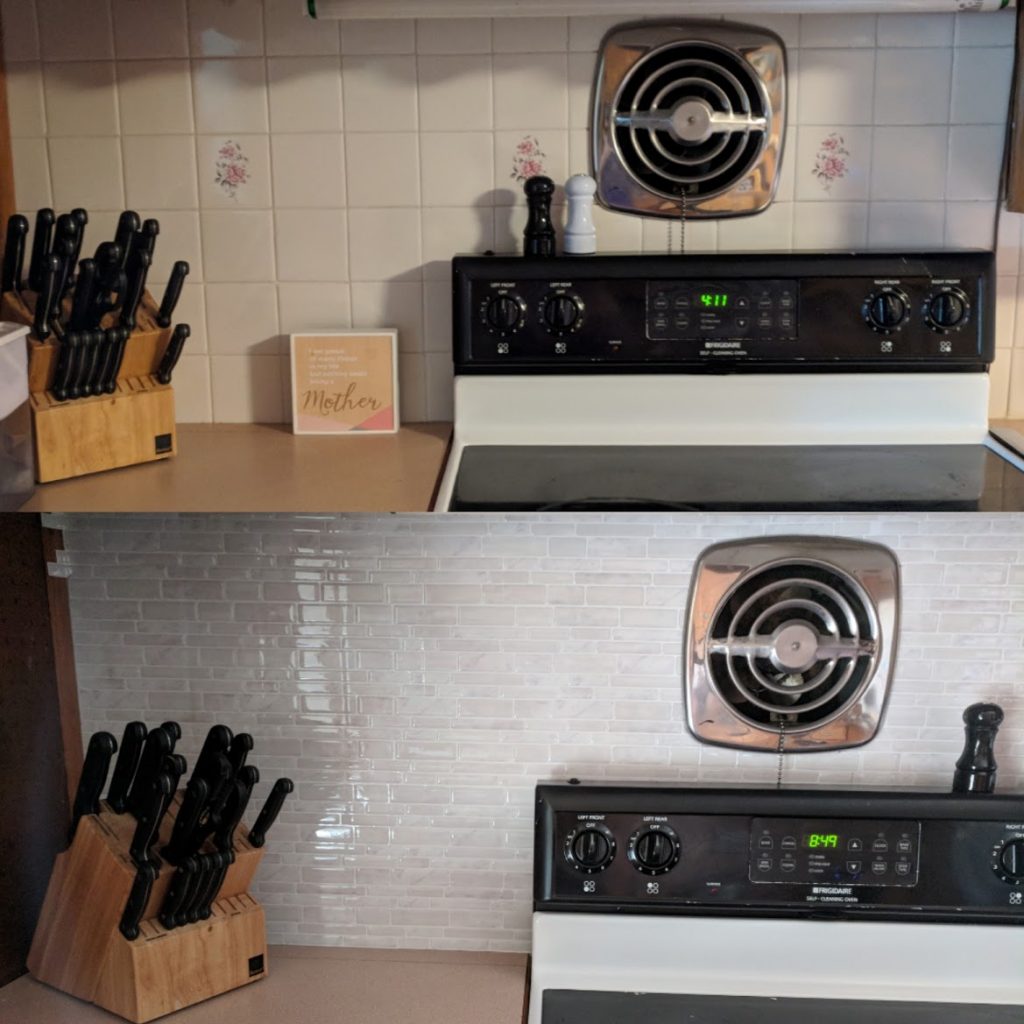 Even with the mistake I made, I’d absolutely recommend this to anyone. The difference in my kitchen is incredible.
P.S. Seeing what a difference this made in my kitchen inspired to move to the next thing part of my kitchen. About a month after this, I painted that countertop to look like granite and got awesome results.
A few months afer that, I painted the cabinets with General Finishes milk paint and covered up alllllll that ugly orange wood. See the entire kitchen transformation here. Here’s a little peak of how it all turned out–all for under $400.
Even with the mistake I made, I’d absolutely recommend this to anyone. The difference in my kitchen is incredible.
P.S. Seeing what a difference this made in my kitchen inspired to move to the next thing part of my kitchen. About a month after this, I painted that countertop to look like granite and got awesome results.
A few months afer that, I painted the cabinets with General Finishes milk paint and covered up alllllll that ugly orange wood. See the entire kitchen transformation here. Here’s a little peak of how it all turned out–all for under $400.